


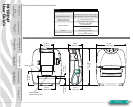


P4T/RP4T
User Guide
40
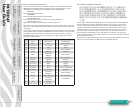
Printer Preparation
pg. 7
Connecting the
Printer pg. 27
Radio Regulatory
Information pg. 31
RP4T Printers pg.
35
Maintenance pg. 36
Troubleshooting pg.
38
Specications pg.
43
Appendices pg. 46 Index pg. 52
P4T Overview-
pg. 5
Manual
Introduction pg. 4
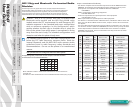
Printing a Conguration Label
To print out a listing of the printer’s current configuration follow
these steps:
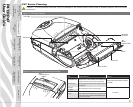
1. Turn the printer off. Load the media compartment with journal
media (media with no black bars printed on the back)
2. Press and hold the Feed Button.
3. Press and release the Power button and keep the Feed button
pressed. When printing starts, release the Feed button.
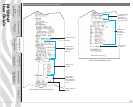
4. The printer will create two reports. The first report is a basic
functional test of the printer. It prints a series of interlocking
“X” characters which acts as a test of the printhead elements
and reports on basic features of the printer including memory
installed.
The second report is a detailed list of the printer’s configura-
tion, including any options installed (such as radios) and cur-
rent status of system settings.
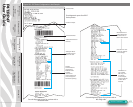
Refer to Figures 18.1 through 18.2 for a sample configuration
label printout.
Performing a Forced Shutdown
It the printer has locked up and is not responding to any operator
inputs or external commands, from either a connected terminal or
a linked LAN, you can perform a forced shutdown.
• If the printer software locks up during normal operation, force
the printer to shut down by pressing and holding the Power
Button for 3 seconds.
• If you try to turn the printer off normally and the software
locks up, the printer will automatically shut itself off after a 10
second delay.
• If you try to turn the printer off and it does not respond, you
can force an immediate shut down by pressing and holding
the Power Button again within 10 seconds.
A forced shutdown will preserve the printer’s data and settings.
Communications Diagnostics
If there’s a problem transferring data between a terminal or WLAN,
placing the printer in the Communications Diagnostics Mode (also
referred to as the “DUMP” mode) will allow diagnostic analysis. The
printer will print transmitted data as ASCII characters and their text
representation (or a period “.” if not a printable character) for any
data received from the host terminal or network
To enter Communications Diagnostics Mode:
1. Print a configuration label as described above.
2. At the end of 2nd diagnostics report, the printer will print:
“Press FEED key to enter DUMP mode.”
3. Press the FEED key. The printer will print: “Entering DUMP
mode.”
Note • If the FEED key is not pressed within 3 seconds, the
printer will print “DUMP mode not entered” and will resume
normal operation.
4. At this point, the printer is in DUMP mode and will print the ASCII
hex codes of any data sent to it, and their text representation (or
“.” if not a printable character).
Additionally, a file with a “.dmp” extension containing the ASCII
information will be created and stored in the printer’s memory. It
can be viewed, “cloned” or deleted using the Label Vista applica-
tion. (Refer the Label Vista documentation for more information.)
To terminate the Communications Diagnostics Mode:
1. Turn the printer OFF.
2. Wait 5 seconds.
3. Turn the printer ON.
The printer will resume normal operation.
Calling Technical Support
If the printer fails to print the configuration label, or you encounter
problems not covered in the Troubleshooting Guide, contact Zebra
Technical Support. You will need to supply the following informa-
tion:
• Model number/type (e.g. P4T, RP4T)
• Unit serial number (14 digit number, including dashes) and
Product Configuration Code (PCC) (15 digit number, including
dashes). Refer to Appendix D for the location of these num-
bers.
• Technical support contact information may be found in Ap-
pendix D of this manual.
Troubleshooting Techniques
Section Continues