


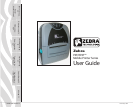


P4T/RP4T
User Guide
9
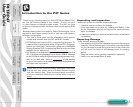
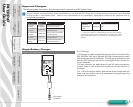
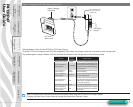
Charging Battery Packs with the AT17696-xx LI72 Single Charger
Plug the LI72 into the appropriate AC wall receptacle, then insert the charge cable into the battery pack charger jack.
The yellow/green charge indicator LED will indicate the status of the charger as per the following table.
Indicator
Charger
Function
Charger Status
Steady yellow indicator Standby AC power on; no battery being charged
Slow (1 Hz) ashing
yellow indicator
Pre-Charge
Charger is applying trickle charge current
(5% of maximum) to bring a cold battery
temperature up to 0°C before starting a
full charge cycle
Fast (4 Hz) ashing
green indicator
Rapid
Charge
Charger is applying the maximum charge
rate to the battery
Slow (1 Hz) ashing
green indicator
Maintain
Charger is in trickle charge mode(10% of
nominal charge value).
Fast (4 Hz) ashing
yellow indicator
Error
The battery may have an internal short,
or its charge monitoring circuitry may be
malfunctioning. The battery pack should
not be used any further.
Steady green indicator Ready No charge is being applied to the battery
Slow (1 Hz) ashing
alternate yellow and
green indicator
Wait
Battery temperature is too hot. Charging
will not begin until battery temperature
reaches 45°C.
Notes: The battery pack must be removed from the printer when using the AT17696-xx LI72 Single Charger.
Charging will cease three (3) hours after the charger has entered the “Maintain” mode.
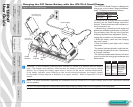
Figure 3: Charging the P4T Series Battery with the LI72
Section Continues
P4T Series
Battery Pack
LI72 Battery
Charger
Battery Charging
Receptacle
Mains connector will
vary with country of
intended use.
Printer Preparation
pg. 7
Connecting the
Printer pg. 27
Radio Regulatory
Information pg. 31
RP4T Printers pg.
35
Maintenance pg. 36
Troubleshooting pg.
38
Specications pg.
43
Appendices pg. 46 Index pg. 52
P4T Overview-
pg. 5
Manual
Introduction pg. 4