


Configuration and Firmware Update
26
NI-3101-SIG Signature Series NetLinx Integrated Controller
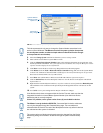
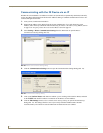
Communicating with the NI Device via an IP
Whether the on-board Master’s IP Address was Static Set (Set IP Info) or Dynamically obtained (Get IP Info),
use the IP Address information from the Network Addresses dialog to establish communication via the LAN-
connected Integrated Controller.
1. From your PC, launch NetLinx Studio 2.
2. Obtain the IP Address of the Master from the System Administrator. If you still do not have an IP
Address, follow the steps outlined in either the Obtaining the Master’s IP Address (using DHCP) section
on page 23 or Assigning a Static IP to the NetLinx Master section on page 24.
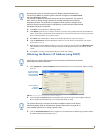
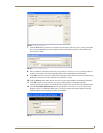
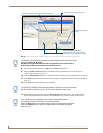
3. Select Settings > Master Communication Settings from the Main menu to open the Master
Communication Settings dialog (FIG. 23).
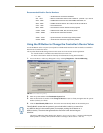
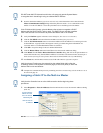
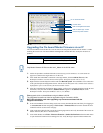
4. Click the Communications Settings button to open the Communications Settings dialog (FIG. 24).
5. Click on the NetLinx Master radio button to indicate you are working with a NetLinx Master, and click
on the TCP/IP radio button to indicate a connection to the Master via an IP Address.
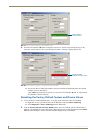
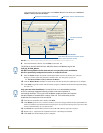
6. Click the Edit Settings button (on the Communications Settings dialog) to open the TCP/IP Settings
dialog (FIG. 25). This dialog contains a series of previously entered IP Address/URLs and their
associated names, all of which are stored within NetLinx Studio and are user-editable.
FIG. 23 Master Communication Settings dialog
FIG. 24 Communications Settings dialog