


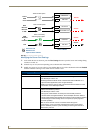


NetLinx Security within the Web Server
70
NI-3101-SIG Signature Series NetLinx Integrated Controller
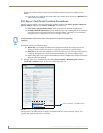
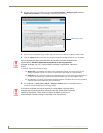
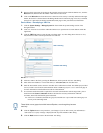
2. Navigate to the Server Certificate page by clicking System Settings > Manage System > Server >
Import SSL Certificate to open the Import Certificate page (FIG. 53).
3. Place the cursor within the empty window and paste the raw text data (in its entirety) into the field.
4. Click the Update button to enter the new encrypted certificate information and save it to the Master.
A certificate consists of two different Keys:
Master Key is generated by the Master and is incorporated into the text string sent to the CA
during a certificate request. It is specific to a particular request made on a specific Master.
Public Key is part of the text string that is returned from the CA as part of an approved SSL Server
Certificate. This public key is based off the submitted Master key from the original request.
Regenerating a previously requested and installed certificate invalidates the previously purchased
certificate because the Master Key has been changed.
5. Use the Server > Create SSL Certificate > Display Certificate option to confirm that the new
certificate was imported properly to the target Master.
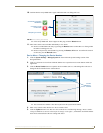
FIG. 53 Import SSL Certificate dialog
Certificate text field
Once a certificate has been purchased from an external CA and then installed onto a
specific Master, DO NOT regenerate the certificate or alter its properties
(example: bit length, city, etc.). If the purchased certificate is regenerated, it becomes
invalid.
A CA server certificate can only be imported to a target Master only after both a
self-generated certificate has been created and the SSL Enable feature has been
selected on the Master. These actions configure the Master to the secure
communication necessary during the importing of the CA certificate.