


6
Quick start
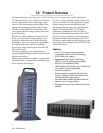
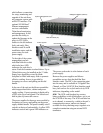
default settings. The Diamond Storage Array
may be set up in a JBOD, RAID Level 0, 5 or 10
configuration with or without Hot Spare sleds
If the Diamond Storage Array is not attached to
a DHCP server and you wish to change the
defaults
1 At the Ready prompt after POST (see above),
type set IPAddress [desired IP address].
2Type set IPSubnetMask [desired IP Subnet
Mask]
3Type set IPGateway [desired IP Gateway]
4Type SaveConfiguration Restart to save the
configuration and restart the Diamond Storage
Array
5 After the powerup and POST complete, type
the IP address from step 1 above into your
browser.
6 The ATTO ExpressNAV screen appears. After
logging in (refer to Step 2b: connect to
Ethernet, Step 5 on page 5), follow the screens
to find information about the array or to
configure the array from the factory-default
settings. The Diamond Storage Array may be
set up in a JBOD, RAID Level 0, 1, 5 or 10
configuration with or without Hot Spare sleds.
Step 3: configure drives
The simplest way to set up configurations is to use
the ExpressNAV interface. Refer to
ATTO
ExpressNAV: Browser-based Interface
on page 23 for
more information on the interface. After logging
in, follow the screens to find information about
the array or to configure the array from the
factory-default settings.
You may the CLI to set up RAID, partitions and
zones.
Note
All arrays using RAID level 10 and Hot Spare
sled options must be fully populated.