


49
ATTO Technology Inc. Diamond Storage Array Installation and Operation Manual
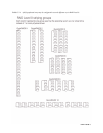
5.0 Configuring Drives
The Diamond Storage Array can be configured as JBOD, RAID Level 0, RAID Level 1, RAID Level 10
or RAID Level 5 with zones, partitions and/or hot spare sleds. The default is JBOD with a single zone
which includes all LUNs (devices), all ports and all hosts. RAID is a storage configuration which uses
multiple disk drives to increase capacity, performance and/or reliability.
You may configure your Diamond Storage Array in
several different ways depending on your needs
although the Diamond makes some choices for your.
The following elements must be considered when you
are configuring your Diamond.
• RAID level
• Interleave
• Hot Spares option
• Number of partitions
• Number of zones
Using the ExpressNAV browser-based interface is the
easiest way to set up your Diamond. You may also use
the Command Line Interface commands.
CAUTIONCAUTION
Changing these parameters causes all
previous drive data on the Diamond
Storage Array to be erased. Make sure you
back up all information before setting up a
different configuration.
JBOD (Just a Bunch of Disks)
JBOD (Just a Bunch of Disks) configuration, the
default for the Diamond Storage Array, allows many
individual disk drives to be available for normal
storage operations. A JBOD configuration allows you
to access each disk drive in the array independently.
Any action you can do to a normal disk drive can be
performed on any disk in the JBOD.
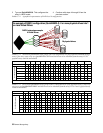
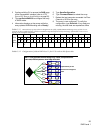
RAID Level 0
RAID Level 0 (striping) is based on the fact that
increased disk performance can be achieved by
simultaneously accessing data across multiple disk
drives in an array. This arrangement increases data
transfer rates while reducing average access time by
overlapping drive seeks. RAID Level 0 groups provide
data that is striped across several drives. RAID Level
0 is pure striping, without redundancy, meaning there
is no data protection. If one disk fails, all data within
that stripe set is lost.
RAID Level 0 is used by applications requiring high
performance for non-critical data.
The
QuickRAID0
command, accessed through the
Command Line Interface, allows a simple, fast, out-of-
the-box setup of the array into evenly-sized RAID
Level 0 stripe groups.
RAID Level 1
RAID Level 1 (mirroring) ensures the security of data
by writing the exact same data simultaneously to two
or more different drives. This application is for users
with critical data which cannot be lost or corrupted due
to the failure of a single drive.
With RAID Level 1, the host sees what it believes to
be a single physical disk of a specific size: it does not
know or care about the mirrored pair. The RAID
controller manages where data is written and read,
allowing one disk to fail without the host knowing it
has failed. The array sends notification of the failure
over the serial or Ethernet port and the fault LED is
illuminated. Service personnel can then replace the
failed drive and initiate a rebuild.
RAID Level 1 is used in applications containing
mission critical data. The QuickRAID1 command,
accessed through the CLI, allows a simple, fast, out-
of-the-box setup of the array into RAID Level 1
mirrored groups.
RAID Level 10
RAID Level 10 (mirroring with striping) increases
data transfer rates while ensuring security by writing
the exact same data simultaneously to two or more
different drives. RAID Level 10 is used in applications
requiring high performance and redundancy,
combining the attributes of RAID Levels 1 and 0.
The QuickRAID10 command, accessed through the
CLI, allows a simple, out-of-the-box setup of RAID
Level 10 groups.
RAID Level 5
RAID Level 5 increases reliability while using fewer
disks than mirroring by employing parity redundancy.
Distributed parity on multiple drives provides the
redundancy to rebuild a failed drive from the
remaining good drives. Parity data is added to the