


55
ATTO Technology Inc. Diamond Storage Array Installation and Operation Manual
5.3 RAID Level 1
The Diamond Storage Array can be set up into RAID Level 1 (mirrored) groups, with or without hot
spare sleds, to provide greater reliability by simultaneously writing data to two sleds. Each sled
partnered through QuickRAID1, a CLI command, has the same data as its partner.
CAUTIONCAUTION
Selecting RAID configuration causes all
previous drive data on the Diamond
Storage Array to be erased. Make sure all of
your information is backed up before
setting up RAID groups.
The configuration of RAID Level 1 performs the
same operations on two partnered sleds at the
same time, providing an automatic backup of
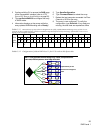
data. The operating system sees the two sleds as
one Virtual Drive with its own LUN (Logical Unit
Number).
The
QuickRAID1
command allows the
Diamond Storage Array to be set into mirrored
drives. The command first spans two drives on a
sled together, then partners two sleds to be a
RAID Level 1 group designated by a LUN
(logical unit number).
When you initially set up RAID groups using the
QuickRAID
command, groups are synchronized
automatically because there is no pre-existing
data on the drives. However, drives may display
as “degraded, and you need to set all LUNs to OK
status. Refer to
Rebuilding RAID Level Configurations
on page 63.
Note
Because the ExpressNAV pages take you
through this process easily, the following
instructions are based on the CLI commands.
Use these instructions as a guide in
ExpressNAV.
To set up RAID Level 1 groups
1 Connect to Diamond Storage Array services via
the RS-232 port or the optional Ethernet
management services card (refer to
Accessing
the Array
on page 17). You should now be in
Command Line Interface.
2 Continue with the CLI or access the RAID page
of the ExpressNAV interface (refer to
ATTO
ExpressNAV: Browser-based Interface
on page 25).
3 QuickRAID1 has no options: the command sets
up each sled and its mirror image. Type
set
QuickRAID1.
4 Information displays on the screen while the
array updates NVRAM ending with a Ready*.
5Type SaveConfiguration.
6Type FirmwareRestart to reboot the array.
7 Reboot the host computer connected via Fibre
Channel or SCSI to the array.
8 The array is now configured. To verify the
configuration, type DriveInfo. If any sleds are
missing, the sled slots are reported as offline.
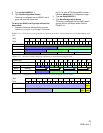
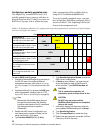
In a fully populated array, your operating system
displays you have six drives.
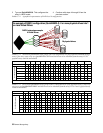
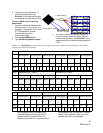
Note
In a less than fully populated array, if both
partners of a LUN are missing, the LUN does
not exist. If only one partner is missing, the
LUN does exist, but it is degraded
(unprotected). See Exhibit 5.3-1 to determine
which LUNs would be affected.
To set up RAID Level 1 with Hot Spare sleds
1 Connect to Diamond Storage Array services
(refer to
Accessing the Array
on page 17) and use
the CLI or enter ATTO ExpressNAV browser
interface Advanced CLI configuration page.
2Type set QuickRAID 1 2
3Type SaveConfiguration Restart
The Diamond is configured into one RAID Level 1
group with two Hot Spare sleds.
To remove RAID groups
1 Connect to Diamond Storage Array services via
the RS-232 port or the optional Ethernet
management services card (refer to
Accessing
the Array
on page 17). You should now be in
CLI.