


52
RAID Level 0
5.2 RAID Level 0
The Diamond Storage Array can be set up into RAID Level 0 (striping) groups to allow it to read and
store data at a higher transfer rate. QuickRAID0, a CLI command, allows you to set up the system as if
it were a single drive instead of separate drives.
CAUTIONCAUTION
Selecting RAID configuration causes all
previous drive data on the Diamond
Storage Array to be erased. Make sure all of
your information is backed up before
setting up RAID groups. You may copy
drives first. Refer to
Drive Configuration
Commands
on page 43.
RAID Level 0 groups provide data that is striped
across several drives. The QuickRAID0 command,
accessed through the Command Line Interface, sets up
the Diamond Storage Array into evenly-sized RAID
Level 0 stripe groups. Each stripe group is a Virtual
Drive named with its own LUN (logical unit number).
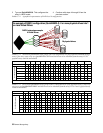
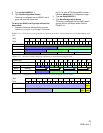
With a fully populated array, RAID 0 may be
configured as 1, 2, 3, 4, 6, or 12 LUNs. As RAID0 1,
all 24 drives are configured as a single stripe group.
You may also configure two LUNs of 12 drives each,
three LUNs of eight drives each, four LUNs of six
drives each, six LUNs of four drives each and 12
LUNS of two drives each. (See Exhibit 5.2-4). The
command assumes there are 24 drives available to
configure the number of LUNs.
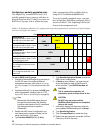
Sled-based versus disk-based
RAID Level 0 can be configured one of two ways,
sled-based or disk-based. The default is sled-based.
Sled-based
Use sled-based if an external RAID
controller controls the array to ensure that both drives
on a sled are members of the same RAID group
(LUN). Removing one sled does not affect other
LUNs.
Drive-based
RAID0 designates each drive on a sled
as a either partner 1 or partner 2. Stripe groups are
made by combining all partners designated as 1
together, and all partners designated as 2 together.
Removing one sled affects more than one LUN
because each partner belongs to a different LUN.
To set up RAID Level 0 groups
1 Connect to Diamond Storage Array services via
the RS-232 port or the optional Ethernet
management services card (refer to
Accessing
the Array
on page 17). You should now be in
CLI.
2 Continue with the CLI or access the RAID page
of the ExpressNAV interface (refer to
ATTO
ExpressNAV: Browser-based Interface
on page 25).
Note
Because the ExpressNAV pages take you
through this process easily, the following
instructions are based on the CLI commands.
Use these instructions as a guide in
ExpressNAV.
3 QuickRAID0 options are 0, 1, 2, 3, 4, 6 and 12
RAID groups, sled-based or drive-based. The
number indicates the number of RAID groups
the array is divided into. Sled or drive indicates
the way you want the array striped. The
QuickRAID0 command divides the total
number of drives in the same array equally by
the number called out in the command. Type
set QuickRAID0 [0|1|2|3|4|6|12]
[DRIVE|SLED]
4 Information displays on the screen while the
array updates NVRAM ending with a Ready*.
5Type SaveConfiguration.
6Type FirmwareRestart to reboot the array.
7 Reboot the host computer connected via Fibre
Channel or SCSI to the array.
8 The array is now configured. To verify the
configuration, type DriveInfo. If any sleds are
missing, the sled slots are reported as offline.
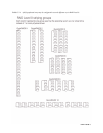
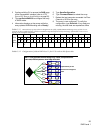
If sled(s) or drive(s) are physically missing from the
array, the entire stripe group (LUN) containing the
drive(s) is unavailable. To determine which drives
would be unavailable in various configurations, see
the exhibits below.
To remove RAID Level 0 groups from the array
1 Connect to Diamond Storage Array services via
the RS-232 port or the optional Ethernet
management services card (refer to
Accessing
the Array
on page 17). You should now be in
CLI.
2 Continue with the CLI or access the RAID page
of the ExpressNAV interface (refer to
ATTO
ExpressNAV: Browser-based Interface
on page 25).