


6. Getting started
MENU
EXIT
ENTER
PAUSE
TEXT
PHASE
TINT
COLOR
BRIGHTN
CONTR
9
0
7
8
5
6
3
4
1
2
LENS
LENS
ZOOM
LENS
SHIFT
LENS
FOCUS
1
22
2
3
4
5
6
7
8
9
10
11
12
13
14
17
15
16
19
20
18
L
SHARPN
LENS
SHIFT
21
1
2
3
4
5
6
7
89
0
MENU
EXIT
ENTER
RGB
STBY
PAUSE
TEXT
PATTERN
WINDOW
PIP
LENS
RIGGING
AUTO
310 10
19
17
5
8
21
920166
1
7
2
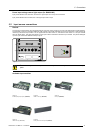
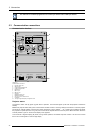
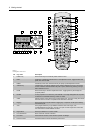
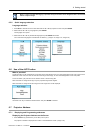
Image 6-1
Local keypad & remote control
Ind. Key name Description
1 Pattern key Direct access key to the internal pattern selection menu.
2
RGB
Toggle key to enable and disable colors in the adjustment mode. Toggle between red,
green, blue and full RGB.
3 MENU Access key to the menu structure and key to quickly quit the adjustment menus.
4 Address key
(recessed key), to enter the address of the projector (between 0 and 9) in the remote
control. Press the recessed address key with a pencil, followed by pressing one digit
button between 0 and 9.
5
LENS Direct access key to the lens adjustment menus. Toggling this key will change the
projected pattern.
6 PAUSE To stop projection for a short time, press ’PAUSE’. The image disappears but full power
is retained for immediate restarting. Shutter is closed.
7
STBY Standby function switch off the lamp and lamp electronics. The lamp cooling fans remain
active for about 5 minutes. The speed of the other fans is reduced.
8 Rigging Direct access key to layout selection. Rigging key + sequence number opens directly
the desired layout.
9Auto
User programmable key to get different functions from auto image, auto
contrast/brightness to auto align. This key can open an Auto image menu so that the
user has access to these different functions.
10 Digit buttons Direct input selection or numeric entries
11
Lens zoom/focus Zoom and focus controls of the lens
12
Lens shift Shift control of the lens, to shift the lens up/down or left/right
13 Picture controls Use these buttons to obtain the desired picture level.
48
R59770021 CLM R10+ 11/10/2010