


System Overview 1-9
6&6,&RQILJXUDWLRQ*XLGHOLQHV
SCSI hard-disk drives must be configured as follows:
Disable termination on the drive. The SCSI backplane board provides termi-
nation for the SCSI bus.
Set the SCSI ID on all drives to 0. All SCSI ID numbers for the drives are set
by the SCSI backplane board.
Configure the drive so that the drive motor waits for a start unit command
from the SCSI host adapter before spinning.
SCSI devices (except hard-disk drives) in the external drive bays are controlled
by the Ultra/Narrow SCSI controller on the system board. Hard-disk drives in
the external drive bays are controlled by a RAID controller or the Ultra2/LVD
SCSI connector via a two-device ribbon cable from the external drive bay
insert’s backplane board. Although SCSI devices are installed essentially the
same way as other devices, their configuration requirements are different. To
configure SCSI devices installed in the external bays, follow the guidelines in
the following subsections.
6&6,,'1XPEHUV
Each device attached to the Ultra/Narrow SCSI host adapter must have a
unique SCSI ID number from 0 to 7.
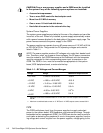
When SCSI devices are shipped from Dell, the SCSI ID defaults are assigned
as follows:
The integrated Ultra/Narrow SCSI host adapter is configured through the
BIOS as SCSI ID 7.
A SCSI tape drive is configured as SCSI ID 6 (the default for a tape drive).
A SCSI CD-ROM drive is usually configured as SCSI ID 5.
NOTE: There is
no
requirement that SCSI ID numbers be assigned sequentially or
that devices be attached to the cable in order by ID number.
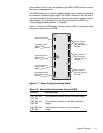
'HYLFH7HUPLQDWLRQ
All Dell PowerEdge 4300 systems have an active terminator installed at the
end of the SCSI cable.
All
of the devices attached to the SCSI cable should
have their termination disabled.
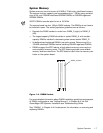
363%DQG6\VWHP3RZHU6XSSOLHV
The Dell PowerEdge 4300 system provides one (when available as an option),
two, or three 320-W system power supplies and, when necessary, a PSPB.
See “System Power Supply” or “System Power Supply and PSPB Upgrade” in
Chapter 4 for the installation procedure for this option.