


4-16 Dell PowerEdge 4300 Systems Service Manual
6\VWHP3RZHU6XSSO\
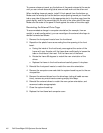
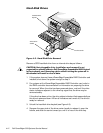
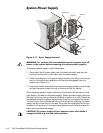
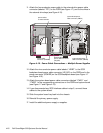
)LJXUH3RZHU6XSSO\5HPRYDO
:$51,1*)RUV\VWHPV ZLWK QRQUHGXQ GD QWSRZHUVX SS OLHVWXUQRII
SRZHUWRWKHV\VWHPEHIRUHUHPRYLQJWKHV\VWHPSRZHUVXSSOLHV
To remove a power supply, follow these steps:
1. Disconnect the AC power cable from the electrical outlet, and then dis-
connect the other end of the cable from the power supply.
2. Press the locking bar in the power supply handle to the left (or up if the sys-
tem is in the rack-mount position) until the latch disengages from the
chassis (see Figure 4-11).
3. Rotate the handle outward (forcing the power supply partially out of its bay)
and pull the power supply the rest of the way out by the handle.
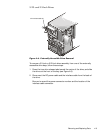
When installing a power supply, make sure the handle is all the way out (at a
right angle to the back of the power supply). Slide the power supply
almost
all
the way into its bay, letting it extend out about a quarter of an inch. Rotate the
handle back toward the power supply while fitting the two legs of the handle
into the cutouts in the chassis wall and, at the same time, pressing the power
supply the rest of the way into the bay. Then push the locking bar to the right
(or down if the system is in the rack-mount position) until the latch snaps into
place, securing the power supply.
&$87,217KHSRZHUVXSSO\ZLOOQRWRSHUDWHXQOHVVWKHKDQGOHLV
VQDSSHGDOOWKHZD\LQWRWKHORFNHGSRVLWLRQ
cutouts (2)
handle
locking bar
latch
legs (2)