


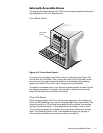
Removing and Replacing Parts 4-1
&+$37(5
5HPRYLQJDQG5HSODFLQJ3D UWV
This chapter provides procedures for removing the components, assemblies,
and subassemblies in the computer. Unless otherwise noted, each procedure
is based on the following assumptions:
You have performed the steps in “Precautionary Measures” found later in
this chapter.
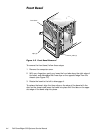
You have removed the computer cover and/or front bezel as necessary.
You can replace or reinstall a part by performing the removal procedure in
reverse order unless additional information is provided.
:$51,1*7KHSRZH UVXSSOLHVLQWKLVFRPSXWHUV\VWHP SURGXFHKLJK
YROWDJHVDQGHQHUJ\KD]DUGVZKLFKFDQFDXVHERGLO\KDUP2QO\
WUDLQHGVHUYLFHWHFKQLFLDQVDUHDXWKRUL]HGWRUHPRYHWKHFRPSXWHU
FRYHUDQGDFFHVVDQ\RIWKHFRPSRQHQWVLQVLGHWKHFRPSXWHU
5HFRPPHQGHG7RROV
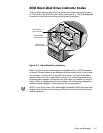
The PowerEdge 4300 has been designed for greater manual serviceability.
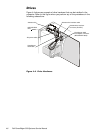
Removing and replacing hard-disk drives in the external drive bay insert
requires a small flat-blade screwdriver. The remaining procedures do not
require the use of tools.
Also, use a wrist grounding strap as explained in the next section, “Pre-
cautionary Measures.”