


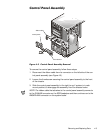

4-8 Dell PowerEdge 4300 Systems Service Manual
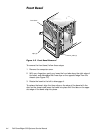
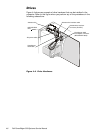
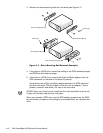
To remove a close-out panel, pry the bottom of the panel outward at the center
until you can unhook a securing tab at one end and work out the other end.
When installing close-out panels, install 1.6-inch panels from the bottom up.
Make sure the overlap lip is at the bottom and projecting toward you. Insert the
tab on one side of the panel into the appropriate slot in the drive cage, bow the
panel slightly, and fit the second tab into the slot in the other side of the cage.
Make sure the sides of the panel fit flush against the sides of the drive cage.
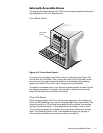
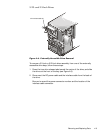
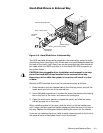
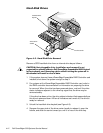
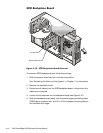
5 HRULHQWLQJWKH([WHUQDO'ULYH&DJH
To accommodate a change in computer orientation (for example, from an
upright to a rack configuration), you can reconfigure the external drive bays to
remain horizontal as follows:
1. Remove the front-panel inserts from the front bezel.
2. Reposition the plastic frame surrounding the drive opening in the front
bezel:
a. Facing the inside of the front bezel, press against the center of the
frame with your thumbs until the frame bows sufficiently to loosen the
tabs on the sides of the insert. Pull the frame out of the bezel.
b. Rotate the frame 90 degrees to match the new orientation of the
drives.
c. Replace the frame in the front bezel and carefully press it into place.
3. Reinstall the front-panel inserts to match the new drive orientation.
4. Remove the computer cover and slide the system board tray out to the ser-
vice position.
5. Remove the external drives from the drive bays (noting all cable connec-
tions); remove any metal inserts covering empty drive bays.
6. Reinstall the external drives to match the new system orientation, and
reconnect cables as appropriate.
7. Close the system board tray.
8. Replace the front bezel and computer cover.