


Removing and Replacing Parts 4-11
+DUG'LVN'ULYHVLQ([WHUQDO%D\
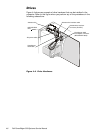
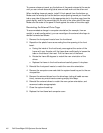
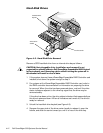
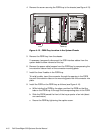
)LJXUH+DUG'LVN'ULYHVLQ([WHUQDO%D\
Two SCSI hard-disk drives can be installed in the external bay using the exter-
nal drive-bay insert (see Figure 4-8). Drives mate to a small backplane board on
the back of the insert; from there, they can be connected via a two-device rib-
bon cable either to a RAID controller or to the Ultra2/LVD SCSI connector on
the system board.
&$87,21+RWSOXJJDEOHGULYHLQVWDOODWLRQDQGUHPRYDOLV
QRW
VXS
SRUWHGIRUKDUGGLVNGULYHVLQVWDOOHGLQWKHH[WHUQDOGULYHED\
5HPRYLQJDGULYHZKLOHWKHV\VWHPLVWXUQHGRQZLOOUHVXOWLQDORVV
RIGDWD
Remove a SCSI hard-disk drive from the external drive bay as follows:
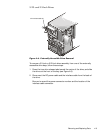
1. Press inward on the two release tabs on the drive bay insert, and pull the
insert about one inch out of the external bay.
2. Use a flat-blade screwdriver to remove the screw that secures the locking
bar on the front of the insert, and remove the locking bar.
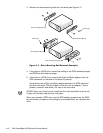
3. Open the drive carrier handle to release the carrier, and slide the carrier
toward you and out of the insert.
When installing a drive in the insert, slide the drive in with the handle open
until it stops, and then push the handle closed and slide the drive in the rest of
the way. Replace the locking bar before installing the insert into the chassis.
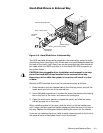
If you are not replacing the drive, install a metal close-out panel on the front of
the external bay or a front-panel insert on the front bezel.
drive in drive carrier
drive-carrier
locking bar
drive carrier handle
external drive-bay insert
release tabs (2)
flat-head
screw