


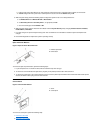

3. If not already done, remove the drive bracket from the chassis.
4. Attach the new hard-disk drive to the bracket with the four screws you removed in step 8 of the previous procedure.
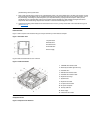
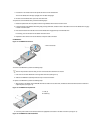
5. Reinstall the hard-disk drive/bracket in the chassis (see Figure 12).
6. Place the bracket so that the release tabs extend about one inch past the front of the chassis, and align the tabs on the bottom of the bracket
with the hooks on the chassis floor.
7. Slide the bracket toward the back of the chassis until the tabs snap under the hooks (see Figure 12). The bracket release tabs should also
snap into the front of the chassis.
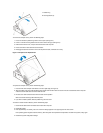
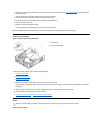
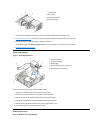
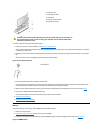
8. Connect a power cable to the power input connector on the back of the drive, and connect an EIDE cable to the interface connector on the
back of the drive (see Figure 13).
Check all connectors to be certain that they are properly cabled and firmly seated.
Figure 13. Hard-Disk Drive Cable Attachment
NOTICE: You must connect the blue connector on the EIDE interface cable to the IDE1 connector on the system board to avoid
possible damage to your system.
NOTICE: You must match the red-colored stripe on the EIDE cable with pin 1 on the drive's interface connector to avoid possible
damage to your system.
NOTICE: You must match the red-colored stripe on the EIDE interface cable with pin 1 on the IDE1 connector to avoid possible
damage to your system.
9. If it is not already connected, connect the blue connector on the EIDE interface cable to the IDE1 connector on the system board.
To locate the IDE1 connector on the system board, see "System Board Components."
10. Replace the drive shelf and connect the diskette and CD-ROM drive power and interface cables.
11. Replace the computer cover. Then reconnect your computer and peripherals to their electrical outlets, and turn them on.
12. Insert a bootable diskette into drive A.
13. Turn on the computer system.
14. Enter System Setup and update Primary Drive 0 (see the online System User's Guide for complete information on System Setup).
After you update the System Setup settings, reboot the system.
15. Partition and logically format your computer's hard-disk drive before proceeding to the next step.
See the documentation for your operating system for instructions.
16. Reset the chassis intrusion detector.
17. Test the hard-disk drive by running the Dell Diagnostics (see the online System User's Guide for complete information).
18. If the drive you just installed is the primary drive, install your operating system on the hard-disk drive.
For instructions, refer to the documentation that came with your operating system.
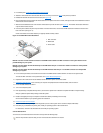
3.5-Inch Diskette Drive
To remove the 3.5-inch diskette drive from the drive shelf, perform the following steps.
1
IDE1 connector
2
EIDE cable
3
Power cable
NOTE: This procedure assumes that you have removed the drive shelf from the chassis.