


Adding and Replacing Parts 199
10
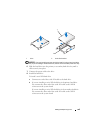
If you are removing a hard drive that has a metal shield, and are not going
to install a replacement drive in the drive bay, reinstall the shield in the
empty bay (see "About Metal Shields (Present in Some Drive
Configurations)" on page 188). Then, install a drive-panel insert (see
"Installing a Drive-Panel Insert" on page 218).
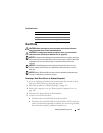
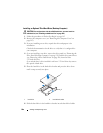
Installing an Optional Third Hard Drive (Tower Computer)
NOTICE: Do not attempt to install a SAS hard drive in the lower 3.5-inch drive bay.
This drive bay will only support a floppy drive or a Media Card Reader.
1
Follow the procedures in "Before You Begin" on page 143.
2
Remove the computer cover (see "Removing the Computer Cover" on
page 145).
3
If you are installing a new drive, unpack the drive and prepare it for
installation.
Check the documentation for the drive to verify that it is configured for
your computer.
NOTE: Drive-panel inserts may contain screws on the inside. You can attach the
screws to new drives that do not have any screws.
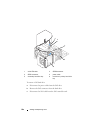
4
If you are installing a new drive
, remove the drive panel (see "Removing the
Drive Panel (Tower Computer)" on page 213) and the drive-panel insert
(see "Removing a Drive-Panel Insert" on page 218) from the upper 3.5-inch
drive bay. Use the screws provided with the new drive to install the drive
into the drive bay.
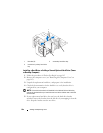
5
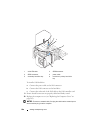
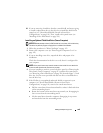
If the FlexBay is not populated and metal shields are present in your
computer (see "About Metal Shields (Present in Some Drive
Configurations)" on page 188), remove the vented metal insert:
a
Pull the vented metal insert forward until its surface is flush with that
of the surrounding chassis.
b
Rotate the bottom of the metal insert up towards you, disengaging its
lower screws from the surrounding metal.
c
Lift the metal insert from the computer, disengaging its top screws
and metal tabs from the surrounding metal.