


258 Adding and Replacing Parts
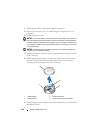
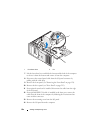
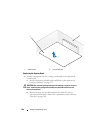
4
On the desktop computer, reattach the power cables to the side of the hard
drive.
5
Run the cables underneath the tabs, and press the tabs to close them over
the cables.
6
Replace the computer cover (see "Replacing the Computer Cover" on
page 262).
NOTICE: To connect a network cable, first plug the cable into the network port or
device and then plug it into the computer.
7
Connect your computer and devices to electrical outlets, and turn
them on.
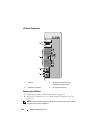
System Board
CAUTION: Before you begin any of the procedures in this section, follow the
safety instructions in the Product Information Guide.
CAUTION: To guard against electrical shock, always unplug your computer from
the electrical outlet before opening the cover.
NOTICE: To prevent static damage to components inside your computer, discharge
static electricity from your body before you touch any of your computer’s electronic
components. You can do so by touching an unpainted metal surface on the
computer.
NOTICE: The system board and metal tray are connected and are removed as one
piece.
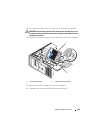
Removing the System Board
1
Follow the procedures in "Before You Begin" on page 143.
2
Remove the computer cover (see "Removing the Computer Cover" on
page 145).
3
Remove the front panel (see "Removing the Front Panel" on page 154).
4
Remove any components that restrict access to the system board.
5
Disconnect all cables from the system board.
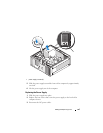
6
Before you remove the existing system board assembly, visually compare
the replacement system board to the existing system board to make sure
that you have the correct part.