


Frame Relay Configuration 6-7
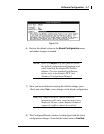
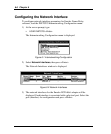
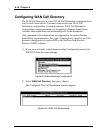
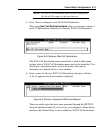
4) Select Frame Relay (EMX F Relay) from the Available Media, then
press <Enter>. The DCP_link
Frame Relay Network lnterface
Configuration
menu is displayed.
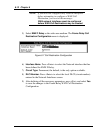
5) Press <Enter> to display a list of the Emulex DCPx86i/e adapters that are
installed.
6) Select the adapter you wish to configure and press <Enter>.
7) Press <Enter> to display the
Interface Options menu. The PAL# will be
displayed. If a different PAL# is to be used, install the corresponding
files first and then select the correct PAL# from the list.
8) Press <Enter> to choose the Data Encoding option, NRZ or NRZI.
9) In the Interface Speed field, press <Enter> to display a list of line
clocking rates. Choose External for modem operation. Generally, the
service provider will be DCE and the default “External” will be used.
10) Interface Status: Press <Enter> to select the Interface Status (normally
Enabled).
NOTE: The Interface Status field is most often used to test
a particular adapter configuration by disabling
other adapters, which prevents them from loading.
11) DLCI Values: Displays the configured DLCI (Data Link Connection
Identifier). Press <Ins> to add a new DLCI number as assigned by the
Frame Relay provider.
12) Check the Parameter Group to ensure all selections match the
requirements of your service provider.
In general, the factory default parameters should be adequate for most
applications. Most installations can limit the updates to these parameters.
To make changes to the above parameters, highlight the field in the
Frame
Relay Network Interface Configuration
menu which requires modification
and select the appropriate value for that parameter:
User Data Size field allows the configuration of the maximum user data
frame, in bytes, that can be received.