


Solving Problems 115
The image contains static, noise, or distortion.
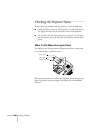
■ If you’re using a video player, make sure the correct Video Signal
is selected in the Video menu (see page 75).
■ If you’re using a computer, press the Auto button (on the remote
control) or the
Auto/Enter button (on the projector). This
automatically resets the tracking, sync, position, and resolution.
■ If you’re using a computer cable longer than 6 feet (2 meters), or
an extension cable, the image quality may be reduced.
■ Keep your computer and video cables away from the power cord
as much as possible to prevent interference.
■ The video signal may be split between the computer and the
projector. If you notice a decline in the projected image quality
when the image is displayed simultaneously on your notebook
and through the projector, turn off the notebook’s LCD display.
The image is blurry.
■ There may be dirt or smears on the lens. Clean the lens as
described on page 100.
■ Adjust the focus using the Focus buttons.
■ Make sure the lens is not fogged up by condensation. You may
need to wait before using the projector after moving it from a cold
environment to a warm environment.
■ If you’re projecting from a computer, press the Auto button (on
the remote control) or the
Auto/Enter button (on the
projector). This adjusts the tracking, sync, position, and
resolution settings.
■ Adjust the Sharpness setting on the Video menu (see page 68).
When you change video settings, you should be able to see the
effect on the screen immediately.