


Extron USA - West
Headquarters
+800.633.9876
Inside USA / Canada Only
+1.714.491.1500
+1.714.491.1517 FAX
Extron USA - East
+800.633.9876
Inside USA / Canada Only
+1.919.863.1794
+1.919.863.1797 FAX
Extron EMEA
+800.3987.6673
Inside Europe Only
+31.33.453.4040
+31.33.453.4050 FAX
Extron Asia
+800.7339.8766
Inside Asia Only
+65.6383.4400
+65.6383.4664 FAX
Extron Japan
+81.3.3511.7655
+81.3.3511.7656 FAX
Extron China
+400.883.1568
Inside China Only
+86.21.3760.1568
+86.21.3760.1566 FAX
Extron Middle East
+971.4.2991800
+971.4.2991880 FAX
© 2008 Extron Electronics. All rights reserved.
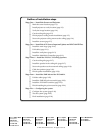
Outline of installation steps
Stage One — Install the Screen and Projector.
c Mark the screen location (page 2-3).
c Install projector to verify location (page 2-3).
c Verify the image location (page 2-4).
c Cut the ceiling tile (page 2-5).
c Finish projector ceiling mount installation (page 2-5).
c Secure the projector ceiling mount to the ceiling (page 2-6).
c Install the screen (page 2-7).
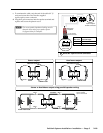
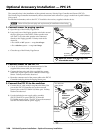
Stage Two — Install the A/V Source Input wall plates and MLC 104 IP Plus.
c Install the mud rings (page 2-10).
c Pull cables (page 2-11).
c Install the wall plates (page 2-12).
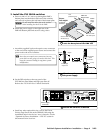
c Install the MediaLink Controller (page 2-13).
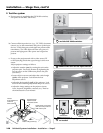
Stage Three — Install the PV SI 3C LP Ceiling Speakers.
c Cut the ceiling tile (page 2-17).
c Install the speaker in the ceiling tile (page 2-17).
c Secure the speakers to the structural ceiling (page 2-18).
c Cable the speakers (page 2-18).
c Finish speaker installation (page 2-20).
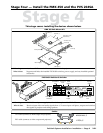
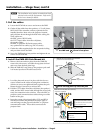
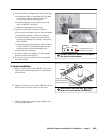
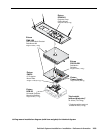
Stage Four — Install the PMK 450 and the PVS 204SA.
c Pull the cables (page 2-22).
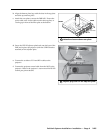
c Install the PMK 450 pole mount kit (page 2-22).
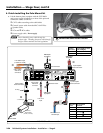
c Install the PVS 204SA switcher (page 2-23).
c Finish installing the pole mount kit (page 2-24).
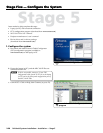
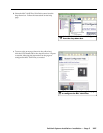
Stage Five — Configuring the system.
c Congure the system (page 2-26).
c Test the system (page 2-28).
c Final installation (page 2-29).