


USING SETUP MODE
User's Manual 5-53
Procedure
This procedure assumes that you are in setup mode. To print the selftest,
make sure that continuous forms paper is loaded into the printer.
Then proceed as follows:
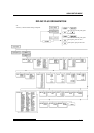
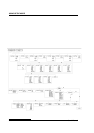
1. Print the <<FUNCTION>> menu.
The <<FUNCTION>> menu should be the last printed line on
the page. If the menu is not printed, press the ONLINE button to
print the menu. If you are using the HEX-DUMP function,
press the “TEAR OFF” or “LOAD” button instead of the
ONLINE button to print the menu. The following
<<FUNCTION>> menu is printed:
<< FUNCTION >>
SAVE&END MENU1 MENU2 HARDWRE ADJUST CONFIG GAP-ADJ DEFAULT LIST SELF-TST
HEX-DUMP V-ALMNT INITIAL
2. Select the SELF-TST function.
Repeatedly press the “TEAR OFF” or “LOAD” button to
position the cursor on the left edge of the aluminum print guide
on SELF-TST, and then press the “
” button or the “ ” button.
The printer selects SELF-TST and starts printing. A short help
menu is printed at the top of the page, followed by the selftest.
Note that the printer is not online during self-test printing.
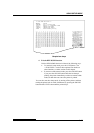
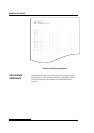
3. Examine the self-test page.
A sample self-test page is shown in Chapter 2. To pause during
self-test printing, press the “LOAD” button. To resume self-test
printing, press the “LOAD” button again.
4. Exit the SELF-TST function.
Exit the SELF-TST function in either of the following ways:
• To exit SELF-TST and remain in setup mode, press the
LF/FF button. The <<FUNCTION>> menu is then
reprinted.
• To exit SELF-TST and return online, press the ONLINE
button. The printer permanently saves any changes made
while in setup mode and returns online.
The self-test can also be started by turning off the printer, and then
pressing the LF/FF button while turning the printer back on. As
described in Chapter 2, this method is useful when you first set up the
printer.