


Hardware Description and Installation
10 EN/LZT 108 6377 R4 - September 2003
wireless MAC address (can be found on an information sticker on
the bottom of the router).
6. Now, the HN294d must be configured for your specific ADSL mode
and other settings. This is described in chapter 3 “Initial
Configuration”.
2.4.2 Connect Computer(s) via Cables
NOTE! If you want to use both a LAN and the USB port, connect
them to two different PCs. It is NOT recommended to connect one
PC to both a LAN and the USB ports simultaneously.
Follow the instructions below to connect the HN294d to your LAN
computer(s) using the Ethernet and/or USB interface:
1. Connect the ADSL Line
Use the provided ADSL Line cable to connect the DSL port of the
HN294d to your ADSL outlet (splitter/filter or phone outlet).
2. Connect a client PC:
- to one of the four LAN ports
Attach one end of the provided Ethernet cable to one of the four
LAN ports of your HN294d. Connect the other end to the Ethernet
adapter port on your client PC.
-- OR --
- to the USB port
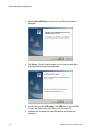
Insert the provided “Drivers & Documentation” CD and follow the
instructions given in the next section – “Install USB Drivers”. DO
NOT connect the USB cable until the installation program instructs
you.
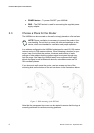
3. Connect the Power Supply
Connect the provided Power cable to the PWR socket of your
HN294d and plug the power supply adapter into a power source.
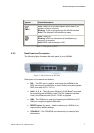
4. Power ON the HN294d
Press the Power button on the back of the HN294d to turn it on.
Check the LEDs on the HN294d according to the following:
The PWR
LED turns On.
The DSL
LED turns On indicating that the ADSL line is ready.
The LED is blinking when handshaking/training for the ADSL line
connection is in progress.