


Hardware Description and Installation
14 EN/LZT 108 6377 R4 - September 2003
2.5 Configure Client PCs
This chapter describes how you can check (and maybe change) the TCP/IP
settings in your computer(s) if you have problems to access the Internet.
Refer to information from your Internet Service Provider.
2.5.1 Use DHCP
If you have not been provided any IP settings from your ISP/service
provider, you should use DHCP that is the most common used method.
In Windows 98/98SE and Me:
1. From the Start menu select Settings > Control Panel and double-
click on the Network icon.
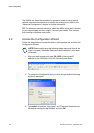
2. Click the Configuration tab and select TCP/IP for the network
adapter (wireless, Ethernet or USB) that is connected to your
HN294d. Click the Properties button.
3. Select the IP Address tab and make sure that “Obtain an IP
address automatically” is selected. If not, select it and click OK.
4. Click OK in the “Network” dialog box and close the Control Panel.
5. Some configuration files may be copied to your hard disk and if a
“Settings Changes” message asks you to restart your PC, you
should answer Yes.
In Windows 2000:
1. From the Start menu select Settings > Control Panel and double-
click on the Network and Dial-up Connections icon.
2. Double-click on the Local Area Connection icon for the HN294d. Be
sure to choose the correct one if you have several dial-up icons.
3. Click the Properties button.
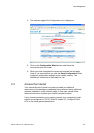
4. Select the Internet Protocol (TCP/IP) and click the Properties
button.
5. Make sure that “Obtain an IP address automatically” is selected. If
not, select it and click OK.
6. Click OK in the “Local Area Connection Properties” dialog box and
click Close in the “Local Area Connection Status” dialog box.