


3-6 Installing Big Ink Packs
Installing Big Ink Packs
You may perform this procedure whenever no printing is in
progress.
1. Move the print head carriage to the access position.
a. On the control panel, press the a (Options) key.
b. Press the c key to select Access Print Heads.
c. Press the e (Menu Select) key. This moves the print head
carriage into the access position.
2. Open the top cover of the printer.
3. Locate the set of Big Ink packs you will be loading.
Each Big Ink pack consists of the ink supply, ink tube, ink
cartridge, and profiler. You will repeat the following proce-
dure to load each Big Ink pack. Start with a Black ink pack.
4. Ensure that the ink valve on the Big Ink pack you are install-
ing is closed.
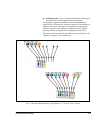
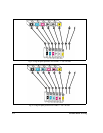
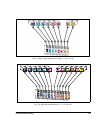
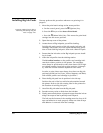
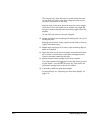
5. Insert the ink profiler into the docking station.
The ink ordinal number on the profiler and cartridge indi-
cate their relative position in the printer. The cartridges
must always be positioned in order from lowest ID to high-
est ordinal number, from left to right (position 1 through
6), with like ordinal numbers adjacent to each other.
In order to print, there must always be at least one Big Ink
pack and profiler each of Cyan, Yellow, Magenta, and Black,
with a Black profiler and cartridge in position 1.
6. Place the Big Ink pack into its position in the ink tray.
Position the end of the box with the tube attached toward
the printer. Refer to the ink routing label in the printer for
the location of each Big Ink pack.
7. Uncoil the Big Ink tube from the Big Ink pack.
8. Smooth out any twists or kinks from the ink tube
9. Gently remove
both
pieces of protective tape from the ink car-
tridge. Save tape to seal a partially-used ink pack.
The hole on the bottom of the cartridge must be clear of all
tape and adhesive to work properly. Make sure that all tape
and adhesive is removed from the cartridge.
To remove a Big Ink pack, refer to
“Removing and Storing a Big Ink
Pack” on page 3-10.