


3-16 Adjusting the Print Head Height
Adjusting the
Print Head Height
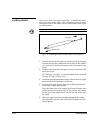
To accommodate media with a wide range of thicknesses, you
can adjust the height of the print heads with the included head
height gauge and 5 mm hex wrench. The tools are stored in a
holder, which is located on the right stand leg under the control
panel.
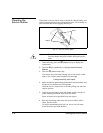
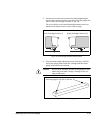
To adjust the print head height, you turn the adjustment screws
on the right and left sides of the carriage until the gauge fits
under the carriage. When used according to these instructions,
the gauge positions the print heads approximately 0.050 inches
(1.27 mm), or 50 mils, above the media.
1. Determine which end of the head height gauge to use.
◆ For media between 3 and 15 mils thick
(0.076-0.381
mm)
,
ensure that no media is loaded on the printer, or
at least is not on the platen. In this case, the head height
is measured from the platen. Use the gauge end marked
“0.003 - 0.015.” This will position the head 0.059 inches
(1.50 mm) above the platen.
◆ For media between 15 and 30 mils thick
(0.381-0.762
mm)
,
ensure that no media is loaded on the printer, or
at least is not on the platen. In this case, the head height
is measured from the platen. Use the gauge end marked
“0.015 - 0.030.” This will position the head 0.072 inches
(1.82 mm) above the platen.
◆ For media greater than 30 mils thick
(0.762 mm)
,
load
the media onto the printer. In this case, the head height
is measured from the media. Use the gauge end marked
“0.003 - 0.015.” This will position the head 0.059 inches
(1.50 mm) above the media.
◆ For media which “bubbles” or doesn’t pull down flat
to the platen, raise the head height sufficiently to pre-
vent the head from contacting the media.