


64
2. Use the backup application software to perform a full media copy of the contents of the D2D to a physical
tape or removable disk target for backup also attached to the media server.
In the case of removable USB disk drives the capacity is probably limited to 2 TB, in the case of physical
LTO5 media it is limited to about 3 TB per tape, but of course multiple tapes are supported if a tape library is
available. For USB disks, separate backup targets for disk devices would need to be created on each
removable RDX drive because we cannot span multiple RDX removable disk drives.
3. The media from the remote sites is then shipped (or even posted!) to the data center site.
4. Place the removable media into a library or connect the USB disk drive to the media server and let the media
server at the data center site discover the removable media devices.
The media server at the data center site typically has no information on what is on these pieces of removal
media and we have to make the data visible to the media server at the data center site. This generally takes
the form of what is known as an “import” operation where the removable media has to be registered into the
catalog/database of the media server at the data center site.
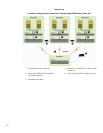
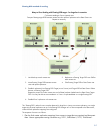
5. Create devices on the D2D at the data center site using an agreed convention e.g. TVTL1, TNASshare1.
Discover these devices through the backup application so that the media server at the data center site has
visibility of both the removable media devices AND the devices configured on the D2D unit.
6. Once the removable media has been imported into the media server at the data center site it can be copied
onto the D2D at the data center site (in the same way as before at step 2) and, in the process of copying the
data , we seed the D2D at the data centre site. It is important to copy physical tape media into the VTL device
that has been created on the D2D and copy the disk target for backup device (RDX) onto the D2D NAS share
device that has been created on the D2D at the data center site.
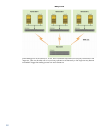
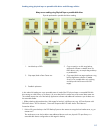
7. Now we have to set up the final replication mappings using our agreed naming convention. Go to the remote
sites and configure replication again to the data center site, being careful to use the agreed naming
convention at the data center site e.g. TVTL1, TNASshare1 etc. This time when we set up replication the
D2D4100 at the target site presents a list of possible target replication devices available to the remote site.
So in this example we would select TVTL1 or TNASshare1 from the drop-down list presented to remote site C
when we are configuring the final replication mappings. This time when the replication starts almost all the
necessary data is already seeded on the D2D4100 for Remote site A so the synchronization process happens
very quickly.
The media servers are likely to be permanently present at the remote sites and data center site so this is making
good use of existing equipment. For physical tape drives/library connection at the various sites SAS or FC
connection is required. For removable disk drives such as RDX a USB connection is the most likely connection
because it is available on all servers at no extra cost.
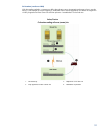
If the D2D deployment is going to use D2D NAS shares at source and target sites the seeding process can be
simplified even further by using the portable disk drives to drag and drop backup data from the source system
onto the portable disk. Then transport the portable disk to the target D2D site and connect it to a server with
access to the D2D NAS share at the target site. Perform a drag and drop from portable disk onto the D2D NAS
share and this then performs the seeding for you!
Note: Drag and drop is NOT to be used for day to day use of D2D NAS devices for backup; but for seeding
large volumes of sequential data this usage model is acceptable.