88 Assembly\Disassembly
Croma24 Service Manual
Always turn the printer OFF, remove the power cord
and the interface cable before beginning any disasembly
procedures. An electrical shock hazard may be present
if these precautions are not followed.
Remove the Left, Middle (Lid), and Right Covers
Removing the Left Cover allows immediate access to the left side of
the Platen for removal of the Carrier Assembly, Carrier Drive Belt,
Tension Assembly, and the Cutter Activator.
Removing the Right Cover provides immediate access to the Main
Printed Circuit Board (MPCB), Control Panel, Servo Motor, and the
MPCB connections (to the Stepper and Servo Motors, Fan, Trailing
Cable, and Power Supply.)
The Middle Cover (Lid) needs to be removed before any of the
other covers can be removed. It also gives access to the Carrier
Assembly and the Service Station when in the open position.
1. Remove Cover Retaining Clips (2) from the Middle (Lid) Cover.
Insert a Needle Nose Pliers into the square openings near the
back of the Lid and remove the Retaining Clip.
2. Put the Middle Cover (Lid) in the open position by lifting the
front of the Middle Cover to the full upward position.
3. Remove the Middle Cover by pushing the Middle Cover
backwards to disengage it from the Left Cover pin. Push back
on the right side to disengage it from the Right Cover pin.
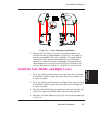
4. Remove the Right Cover by using a flat head screwdriver to
unhook the locking clasps located in Figure 5-1. All clasps can
be accessed from under the Base. Carefully lift off the Cover.


