94 Assembly\Disassembly
Croma24 Service Manual
Install Servo Motor
Integrated circuits may become weakened or damaged
by electrical discharge. Do not touch or work near
integrated circuits without wearing an ESD wrist strap.
1. Put on an ESD wrist strap.
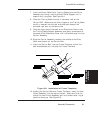
2. Reinsert the Servo Motor under the Platen with the connector
facing the FRONT side of the Platen. Guide the pulley up
through the opening in the Platen.
3. Once the Servo Motor pulley is through the Platen, push up on
the Servo Motor and align the screw holes with the screw hole
openings.
4. Insert the front screw into the Servo Motor and tighten it
almost all the way.
5. Lift up gently and hold the right end of the Trailing Cable.
6. Insert the back screw into the Servo Motor and tighten it.
Make sure the screw does not go into the motor at an angle,
and be careful not to strip the head of the screw or to cause
damage to the Encoder Strip.
7. Tighten both screws on the Servo Motor to 15 in-lb of torque.
8. Push the right end of the Trailing Cable back down into the hole
on the Platen and reconnect the end to J6 on the MPCB.
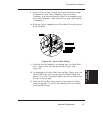
9. Depress the back of the Frame Tensioner and wrap the Carrier
Belt over the Servo Motor pulley. Make sure that the guides on
the inside of the belt are inserted in the pulley grooves and that
the belt is not twisted.
10. Move the Carrier Assembly back and forth to check the Carrier
Belt tension.


