


Chapter 1 — Introduction to Programming the SR60 Scanner
4 SR60 Scanner Programmer’s Reference Manual
• When programming a feature requiring you to scan single
digits to set a multi-digit number, such as Minimum Label
Length, scanning the END bar code (or any item tag/item
value bar code) before completing all input results in an
error tone and causes the scanner to exit Programming
mode. Under these circumstances, the features you were
trying to set are discarded; any previous bar codes scanned
during the session take effect.
• Intermec recommends that you limit each programming
session to one feature at a time. If you make a mistake in
the programming sequence, it can be difficult to discover
where an error has been made if several features are
programmed at once. Additionally, it can be confusing to
determine which features may or may not have been
successfully set following such a session.
3 Scan the END bar code to save any new settings and exit
Programming mode. The scanner sounds a beep and resets
upon exiting Programming mode, and the green LED returns
to its usual state (on steady or off).
4 Maintain an accurate record of all changes you make. There is
a worksheet in Appendix A, “Factory Default Configuration”
on page 145, where you can record your changes.
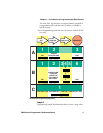
Three Sample Programming Sequences
To modify a scanner feature, you must scan the programming bar
codes in this manual in the correct sequence, depending upon the
feature being programmed. There are three programming
sequences, which are illustrated on the next page.
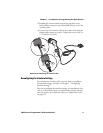
Sample A
Programming sample A is the most commonly used sequence and
demonstrates how three bar codes are scanned to accomplish
these tasks:
1 Enter Programming mode with the SET bar code.
2 Scan the Item Tag that enables the new feature.
Note: If you disconnect power before you scan the END bar
code, all the new settings are discarded. On power-up, the
scanner returns to the previous settings.