


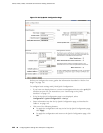
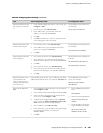

Table 63: Configuring Basic Settings (continued)
CLI Configuration EditorJ-Web Configuration EditorTask
Set the address of the NTP server.
For example:
set ntp server 10.148.2.21
1.
In the Nested configuration section, next to Ntp, click
Configure or Edit.
2.
Next to Server, click Add New Entry.
3.
In the Address box, type the NTP server's IP
address—for example, 10.148.2.21
4.
Click OK.
5.
Click OK a second time to return to the System level
in the configuration editor hierarchy.
Define the NTP server that
NTP requests can be sent
to.
Set the address of the DNS server.
For example:
set name-server 10.148.2.32
1.
Next to Name server, click Add New Entry.
2.
In the Address box, type the address of the DNS
server—for example, 10.148.2.32.
3.
Click OK.
Define the DNS server that
receives DNS requests.
Set the domains to be searched. For
example:
set domain-search lab.router.net
set domain-search router.net
1.
Next to Domain search, click Add New Entry.
2.
In the Value box, type the name of the domain in
which the router is located—for example, lab.router.net.
3.
Click OK.
4.
Next to Domain search, click Add New Entry.
5.
In the Value box, type the name of another domain
that the router belongs to—for example, router.net.
6.
Click OK.
Add each domain that the
router belongs to.
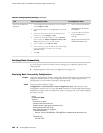
Set the address for the backup
router. For example:
set backup router address
192.168.2.44
In the Backup router section, next to Address, type the IP
address of the backup router—for example, 192.168.2.44.
Define the backup router
to be used when the
router is booting or the
routing protocol processes
are not running.
1.
From the [edit] hierarchy level,
enter
edit interfaces
2.
Delete the existing IP address:
delete lo0 unit 0 family inet
address
3.
Set the IP address and prefix
length of lo0.0. For example:
set lo0 unit 0 family inet
address 172.16.1.24/32
1.
In the configuration editor hierarchy, next to Interfaces,
click Configure or Edit.
2.
In the Interface table, locate the lo0 row and click Unit.
3.
In the Unit table, click 0, and in the Family section
next to Inet, click Configure or Edit.
4.
To delete the existing IP address, click the Discard
button. Select the Delete Configuration Below This
Point option button from the next display.
5.
Next to Address, click Add new entry.
6.
In the Source box, type the address and prefix length
for the loopback interface—for example,
172.16.1.24/32.
7.
Click OK.
Define the IP address for
lo0.0.
Configuring Basic Settings with a Configuration Editor ■ 149
Chapter 7: Establishing Basic Connectivity