


Chapter 4—Setup Adjustments
HJT Model 100 User's Guide 4-5
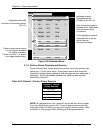
If the projector uses more than one (1) type of VIC, the type can be determined
by accessing the S
YSTEM
-M
AINTENANCE
menu and selecting S
TATUS
L
IST
. Each
VIC slot will be displayed with the type of VIC in each slot. Complete the Timing
section first, Geometry next, and Convergence last.
They are performed in this order because Geometry depends on proper Timing
settings and Convergence depends on correct Geometry.
Ensure that the projector is installed and positioned correctly at the outset so that
all later adjustments will be at their optimal levels and the image will be the
sharpest possible. Positioning the projector is the most important step in the
setup procedures. The projector-to-screen alignment should be as square as
possible before starting setup procedures in order to accomplish Timing,
Geometric, and Convergence adjustments properly.
Prior to starting the procedures, a channel and source (source file) must be
selected for the setup adjustments. This is covered in Section 4.1.2 on page 4-6.
A rough focus of the projection lens may be necessary to be able to read the
menus.
4.1.1. Projection Lens Focus (Rough)
For the Timing and Geometry setup procedures below, it is necessary to
obtain a rough focus of the Projection Lens in order to read menus and
do the adjustments. If the focus is adequate to read the menus, this
procedure can be skipped until after the Timing and Geometry
adjustments are finished. When the Timing and Geometry adjustments
are complete, and prior to starting convergence, the Projection Lens
focus adjustment should be repeated and a sharp focus obtained.
To obtain a Rough Focus of the Projection Lens:
1. Press M
ENU
to display the M
AIN
M
ENU
on the screen.
If necessary, use the E
SCAPE
key to back out to the M
AIN
M
ENU
.
2. Select S
YSTEM
from the M
AIN
M
ENU
.
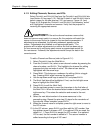
3. Select T
EST
P
ATTERN
from the S
YSTEM
menu.
4. Select F
OCUS
from the T
EST
P
ATTERN
menu.
NOTE: The H pattern is preferred for focusing the Projection Lens.
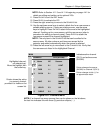
5. Select P
ROJECTION
L
ENS
from the S
YSTEM
menu.
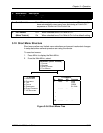
6. A small window displaying F
OCUS
and Z
OOM
arrows appears on the
screen.
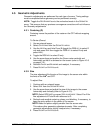
7. Use the up/down arrow keys to zoom the image to the desired size.
The raster and image should be smaller than the screen. Ensure the
F
OCUS
E
NABLE
box in the P
REFERENCES
menu is checked.
8. Use the right/left arrow keys to get a rough overall focus to be able to
read menus. A sharper focus will be obtained later after the Geometry
procedures are completed.
9. Press E
NTER
to complete this adjustment.
10. Press E
SCAPE
twice to display the M
AIN
M
ENU
.