


Chapter 4—Setup Adjustments
4-30 Hughes-JVC Technology Corporation
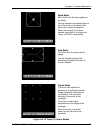
15. When the upper left corner is converged satisfactorily, press E
NTER
to return
to the M
OVE
/S
IZE MODE
.Toggle the M
ODE KEY
to the M
OVE MODE
. Refer to
Figure 4.0-12 on page 4-26 and center the cursor over each of the positions
in the sequence shown, wherever convergence is required, repeating the
M
OVE
/S
IZE
/A
DJUSTMENT
steps for each area that needs convergence.
16. When finished using full screen cursor, press E
NTER
and toggle the M
ODE
KEY
to the S
IZE MODE
.
17. Use the arrow keys to size down to a cursor of approximately ¼ screen size.
18. Select the areas to be converged and converge the entire screen in the
sequence shown in Figure 4.0-13 on page 4-26. Start at the upper left
corner and continue in the same manner as performed with the full screen
cursor in Step 15.
19. Save changes when finished with XY Registration.
4.7. Black Level (G2) and Sensitivity Offset
G2 sets the threshold of the CRT image and is adjusted, along with the Sensitivity
Offset adjustment, using the Grey/Pluge test pattern. Together, these
adjustments determine the level of the darkest and brightest areas of the video
image.
The G2 adjustment is preset at the factory and may need little or no adjustment.
These adjustments are made in sequence, one (1) color at a time. It is preferable
to start with Blue because it is the weakest color of the three (3) to observe.
When the Blue settings are complete, the same adjustments are performed for
Green and Red.
4.7.1. Black Level (G2)
To set the Black Level for Blue:
1. Use the RGB and H
IDE KEYS
to hide R and G. Verify that the
S
HUTTERS ON
H
IDE
box under the S
YSTEMS
-P
REFERENCES MENU
is
checked.
2. Toggle the RGB
KEY
to select B only.
CAUTION!!!
Ensure that only the color to be adjusted is
highlighted. Otherwise all colors are reset and good data from a previous
setup will be deleted.
3. Access C
ONVERGENCE MENU
and select R
ESET
.
4. Access the Grey/Pluge test pattern.
5. Access B
LACK
L
EVEL
(G2), from the C
ONVERGENCE MENU
.
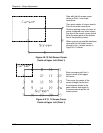
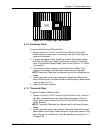
6. Use the up/down arrow keys to adjust the black level so the small,
black square in the center of the larger black square is just barely
visible (as illustrated in Figure 4.0-17). Press E
NTER
when finished.