


Decrease the
transmission speed
1 From the control panel, press Fax Mode.
2 Press
.
3 Press or repeatedly until Fax Setup appears.
4 Press .
5 Press or repeatedly until Dialing and Sending appears.
6 Press .
7 Press or repeatedly until Max Send Speed appears.
8 Press .
9 Press or to select a lower transmission speed.
10 Press to save the setting.
11 Resend the fax.
12 If the problem persists, repeat step 1 through step 11 to resend the fax at successively lower
transmission speeds.
Note: 2400 bps is the lowest transmission speed.
Notes:
• The lower the transmission speed, the longer it will take your fax to print.
• This solution will reduce the speed for future faxes until you reset the transmission speed.
Caller ID information is not displayed
Caller ID pattern may
not be set correctly
The printer supports two distinct Caller ID patterns: Pattern 1 (FSK) and Pattern 2 (DTMF).
Depending on the country or region you live in and the telecommunications company you
subscribe to, you may need to switch the pattern in order for the printer to display Caller ID
information. For more information, see “Using Caller ID” on page 73.
Network troubleshooting
• “The printer to be configured does not appear in the list of printers found on your network” on page 106
• “Cannot print to the network printer” on page 107
• “Network name does not appear in the list” on page 107
Note: If your printer came with a N4050e print server, see the installation instructions and User's Guide on the N4050e
Setup Utility CD.
The printer to be configured does not appear in the list of printers found on your
network
Check security keys SSID is not being broadcast. Make sure security keys are correct.
Check power Make sure the printer is connected to a power source and is turned on. For more information,
see “Power button is not lit” on page 94.
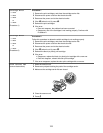
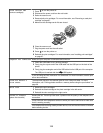
Check Ethernet
connection
If you are using a print server:
1 Check the Ethernet cable for any obvious damage.
2 Firmly plug one end of the Ethernet cable into the printer or the print server.
3 Firmly plug the other end of the Ethernet cable into the network hub or wall connection.
106