


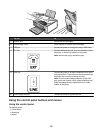

7 Press .
Note: Pressing
selects a setting. An * appears next to the selected setting.
8 To go into additional submenus and settings, repeat step 6 and step 7 as needed.
9 If needed, press repeatedly to return to the previous menus and make other setting selections.
10 Press Start Color or Start Black.
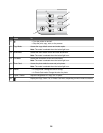
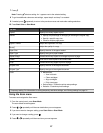
Use this To
Copies
1
Specify how many copies to print.
Resize
1
• Specify the percentage for enlarging or reducing the original copy.
• Specify a specific copy size.
• Create a multiple-page poster.
Lighter / Darker
1
Adjust the brightness of a copy.
Quality
1
Adjust the quality of a copy.
Paper Size Specify the size of the paper loaded.
Paper Type Specify the type of paper loaded.
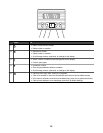
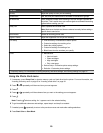
Repeat Image
1
Choose how many copies of an image to print on a page.
Collate Print one or more copies in the correct order.
N-Up
1
Choose how many pages to print on a page.
Original Size
1
Specify the size of the original document.
Original Type
1
Specify the type of the original document.
Tools
• Maintenance
– View ink levels.
– Clean cartridges.
– Align cartridges.
– Print a test page.
• Device Setup—Customize printer setup settings.
• Defaults—Customize printer settings.
1
Temporary setting. For information on saving temporary and other settings, see “Saving settings” on page 31.
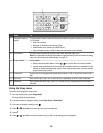
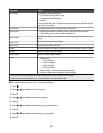
Using the Scan menu
To access and navigate the Scan menu:
1 From the control panel, press Scan Mode.
The scan default screen appears.
2 Press or repeatedly until the scan destination you want appears.
3 If you do not want to change a setting, press Start Color or Start Black.
4 If you want to change a setting, press
.
5 Press or repeatedly until the menu item you want appears.
27