


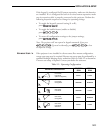
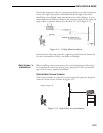

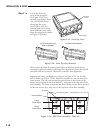
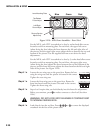
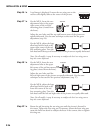
Figure 2-21b. MP-8 Lens Assemblies - Top View
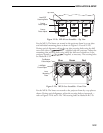
For the MP-9: The lenses are secured to the projector frame by a top plate
and individual mounting plates as shown in Figures 2-21a and 2-22a.
During optical alignment, adjust the top plate securing bolts using the ball
nose screw driver ( ) supplied with the projector. Adjust the
mounting plate securing bolts using either the ball nose screwdriver or the
projector wrench ( ) supplied, as necessary. The securing bolts
are labeled B-C-D.
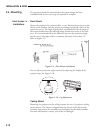
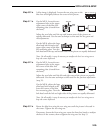
Figure 2-22a. MP-9 Lens Assemblies - Front View
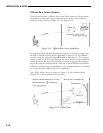
For the MP-8: The lenses are secured to the projector frame by a top plate as
shown. During optical alignment, adjust the securing bolts as instructed —
refer to Figures 2-21b and 2-22b. The securing bolts are labeled A-B-C-D.
Lens
Mounting
Plate
Left/Right
Focus Adjust
Top/Bottom
Focus Adjust
Red
GreenBlue
DCB
Center
Focus Adjust
Lens/CRT
Securing Bolts
Top Plate
Corner
Focus Adjust
A
DCBDCB
AA
A
Red
GreenBlue
INSTALLATION & SETUP
2.19