


30 Chapter 2: Connecting peripherals to the unit
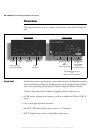
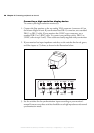
Connecting video input devices
Most Matrox frame grabbers designed for Matrox 4Sight-M have a custom video
input connector that attaches directly to the motherboard, which in turn, is
hard-wired to the video input connector, on the back side of the unit. Therefore,
you can interface a camera with the frame grabber by connecting the camera to
your unit’s video input connector.
Two exceptions to this are Matrox Meteor-II /Digital and Meteor-II /Camera Link
for PC/104-Plus:
• You must connect video sources to Matrox Meteor-II /Digital through the frame
grabber’s two digital video input connectors, Digial Video in 1 and 2, located on
the back side of the unit.
• You must connect video sources to Matrox Meteor-II /Camera Link to the Camera
Link input connectors, located on the back side of the unit.
Note that if you purchase additional frame grabbers for your unit, the video input
connector of your frame grabber will not interface directly with the motherboard.
Therefore, you will have to connect your cameras directly to the additional frame
grabbers. Refer to Chapter 3: Adding devices to the Matrox 4Sight-M motherboard
for information on installing additional frame grabbers to your unit, and refer to
your frame grabber’s installation guide for cabling and pinout information.
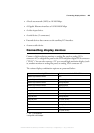
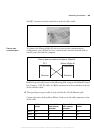
Units with a Matrox Meteor-II /Standard
A DBHD44-TO-13BNC cable is used to interface video sources through Matrox
4Sight-M’s video input connector to a Matrox Meteor-II /Standard frame grabber
(designed for Matrox 4Sight-M).
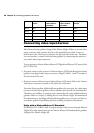
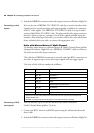
Wire 4BD1+47BD2+
Wire 5BD1-58BD2-
Wire 6 RX- 6 2 TX-
Wire 7BD2+74BD1+
Wire 8BD2-85BD1-
RJ45 Left-side
function
Left-side RJ45
cable-connector
pin-number
Right-side RJ45
cable- connector
pin-number
RJ45 Right-side
function
MATROX IMAGING est distribué par TECHWAY - www.techway.fr - info@techway.fr - +33 (0)1 64 86 58 30