2 Motion Computing LE1600TC Tablet Client User Guide
Chapter
1
Getting Started with Your Tablet Client
• Motion Dashboard for convenient access to Tablet Client controls
• Three clients: Remote Desktop, CITRIX MetaFrame Access® Program
Neighborhood, and Microsoft Internet Explorer for application support
• High speed USB ports
• Front panel status LEDs and function buttons
• Screen rotation
• Handwriting and voice recognition
• PC Card slot for memory expansion, or accessory
connections
• Secure Digital (SD) Card slot to support SD storage devices
• User-configurable power-saving schemes
• Additional I/O ports
• Two audio jacks (designated as microphone/audio in and
headphone/audio out)
• Two USB 2.0 ports
• External VGA monitor port
• RJ-45 (Gigabit Ethernet network)
• DVI-D (Digital Video Interface) port
• Infrared (IrDA) transceiver
• DC power-in port
• Motion Digitizer Pen for ink input, with a pen storage bay and a pen
tether anchor built into the Tablet Client
• Universal security lock slot
QUICK START
INSTRUCTIONS
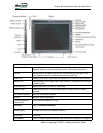
Start the LE1600TC by sliding the power switch. The power LED turns blue
and the Disk Drive (DD) LED intermittently flashes blue (these are the first
and third LEDs on the upper right corner). Then, Windows XP Embedded
launches.
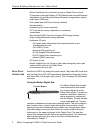
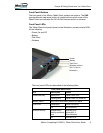
Using the Motion Digital Pen
The Motion Digital Pen contains
internal electronics that enable
you to enter digital ink on the
Tablet Client display. The pen is a
sensitive, electronic, data-entry
device designed in conjunction
with the display. The pen includes
a user-replaceable tip. The pen
contains no batteries and requires no external power. The pen contains a
pen function button, used for right-clicking (like a mouse) and a small
opening at one end for attaching a pen tether cord. Using the pen tether
(provided) helps prevent pen loss. Attach the tether to the built-in pen
tether post on the upper right edge of the Tablet Client. The pen also
comes with replacement pen tips and a replacement tool. For information
about replacing the pen tips, refer to the Care and Maintenance
information in Chapter 3.
Function Button
Tip


