


www.packardbell.com
69
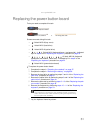
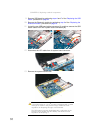
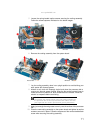
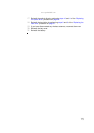
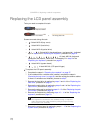
14 Carefully pull the system board out of the base enclosure, and then flip it
over (1).
15 Disconnect the DC-input cable from its system board connector (2), and then
remove the system board (3).
16 Remove the cooling assembly by performing steps 4 – 7 of the “Replacing
the cooling assembly” procedure on page 70.
17 If your new system board does not include a processor, remove the
processor from the old system board and install it on the new system board
by performing steps 5 and 6 in the “Replacing the processor” section on
page 73.
18 Reinstall the cooling assembly by performing steps 8 – 11 of the “Replacing
the cooling assembly” procedure on page 70.
19 Place the new system board in the base enclosure and secure it with the
screw removed in step 13.
20 Reconnect the DC-input, LCD and USB board cables to their system board
connectors.
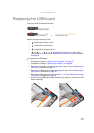
21 Reinstall the USB board by performing steps 8 – 9 of the “Replacing the
USB board” procedure on page 63.
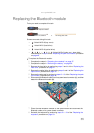
22 Reinstall the Bluetooth module by performing step 7 of the “Replacing the
Bluetooth module” procedure on page 65.
23 Reinstall the keyboard by performing steps 21 – 24 of the “Replacing the
keyboard” procedure on page 53.
24 Reinstall the palm rest module by performing steps 14 – 17 of the “Replacing
the palm rest module” procedure on page 48.
25 Reinstall the optical drive by performing steps 10 and 11 of the “Replacing
the optical drive” procedure on page 46.
26 Reinstall the hard drive by performing steps 8 and 9 of the “Replacing the
hard drive” procedure on page 41.
27 If you have disconnected any wireless antennas, reconnect them now.
28 Reinstall the bay cover.
29 Reinstall the battery.
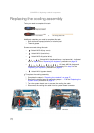
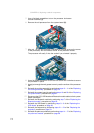
UMA modelDiscrete model