


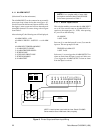


Pelco Manual C1000M-B (1/96) 21
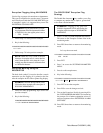
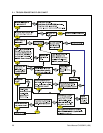
2. Press #6 (you will hear two tones). The following
text will appear:
DIAGNOSTICS SELECTION MENU
1. PROGRAM TRANSFER
2. (DL) BURN IN TEST
3. (DL) INPUT CHANNEL PORT TEST
4. MEMORY TESTS
5. SYSTEM SIGNAL TEST
6. VIDEO SCREEN TEST
7. GRAPHICS SCREEN TEST
8. (DL) Pelco PIM DEFAULT LOAD
ESC TO QUIT OR SELECT # TO
PROGRAM
3. Press #8 (you will hear two tones). The Inter-Check
ICI1000S Series will prompt you:
DEFAULTS BEING LOADED
The DIAGNOSTICS SELECTION MENU will be dis-
played again.
4. Press the ESC key (you will hear one tone). The
Inter-Check ICI1000S Series unit will return to the
monitoring mode and initialize again.
NOTE: Each time you enter the SYSTEM
MENUS and ESC back into the monitoring
mode, the initialization message will be dis-
played.
5. After executing a (DL) Pelco PIM DEFAULT
LOAD, the Inter-Check ICI1000S Series system
parameters are set to the following:
• Data channel: set for Pelco PIM STANDARD
• Data dwell time: continuous display
• Lines displayed: 18 lines
• Characters displayed: 30 characters
• Alarm output : set for six seconds dwell when data
is received.
• Data channel text positioning: column 1
• Exception alarm: OFF
• Auxiliary ports: OFF
• Exceptions: not programmed
• Location ID: not programmed
4.10.8 (DL) Pelco PIM Default Load
The Pelco DEFAULT LOAD should be executed for
the following situations:
• Before doing any programming of the Inter-Check
ICI1000S Series upon initial installation.
• After a firmware update has been completed.
Performing a default load sets up all parameters of the
Inter-Check ICI1000S Series unit to the default settings.
This feature of the Inter-Check ICI1000S Series should
be used in normal PIM installations. After executing a
(DL) the Inter-Check ICI1000S Series communication
parameters are set up to receive data from a PIM. The
Inter-Check ICI1000S Series communication param-
eters are set to the following values:
9600 BAUD
8 BITS
OFF PARITY
NRZ
ASCII
DATA INVERTED
To execute a (DL), follow these steps:
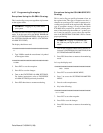
1. Press ENT while in the monitoring mode (you will
hear one tone). The MAIN PROGRAM MENU
will be displayed.
MAIN PROGRAM MENU
1. CHANNEL SETUP
2. SYSTEM PARAMETERS
3. CLOCK SETUP
4. LOCATION ID. SETUP
5. CUSTOMER HEADER
6. DIAGNOSTICS
7. ALARM INPUTS
ESC TO QUIT OR SELECT # TO
PROGRAM