


1–Product Overview
Installing the QLogic Adapter vCenter Plug-in for ESX/ESXi
1-16 SN0054671-00 B
3. Add executable permission for QLflash by issuing the following command:
# chmod +x qlflash
4. If it does not already exist, edit and append the
/usr/lib/vmware/bin/qlflash entry in the
/etc/vmware/UserWorldBinaries.txt file.
For ESXi, the QLflash utility is not required, so no additional steps are necessary.
Updating the Flash
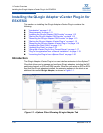
To update the Flash from the QLogic Adapter vCenter Plug-in:
1. Follow the instructions in “Starting the QLogic Adapter vCenter Plug-in” on
page 1-15 to start the vCenter plug-in.
2. In the left pane of the QLogic Adapter page, select the adapter, and then
click the Update Adapter Flash Image link.
3. In the Select Flash File for Update dialog box, click Browse.
4. In the Choose File to Upload dialog box, select the .bin Flash file from the
extracted Flash kit package that is compatible with your adapter, and then
click Open.
5. In the Select Flash File for Update dialog box, click Send.
6. Verify the current Flash version and file version, and then click OK to
continue the update.
7. When asked “Do you want to reset the adapter to activate the firmware
immediately after successful update?,” click OK if you want the new
firmware to take effect immediately. Or, click Cancel to have the new
firmware take effect after the next system reboot.
8. Wait for the Flash update process to complete. Processing time depends on
the network connection and the system configuration. Do not interrupt the
update process.
NOTE:
For ESX systems, before you perform a Flash update on a QLogic Adapter
using the vCenter Plug-in, ensure that the QLflash utility is also installed.
Follow the instructions in the Installing the Flash Utility section.