


RuggedRouter® User Guide
Appendix D - Installing IIS Web Server On
Windows
A number of customers have asked for advice and instructions on setting up an IIS
web server on Windows.
Begin by identifying a host computer that has IIS and its physical and logical location
on the network. The Repository Server Requirements of the appendix “Setting Up
A Repository” provide some guidance on host requirements.
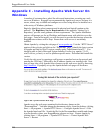
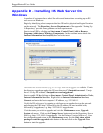
Start to install IIS by clicking on Start menu, Control Panel, Add or Remove
Programs, Add/remove Windows Components. In the resultant menu check the
Internet Information Services(IIS) box and select next.
Download the desired release (e.g. rr1.9.0.zip) from the RuggedCom website. Create
the directory ruggedcom under the IIS root directory C:\Inetpub\wwwroot\. Unzip
the rr1.9.0.zip file within C:\Inetpub\wwwroot\ruggedcom.
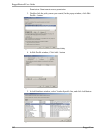
Start to enable IIS by clicking on Start menu, Control Panel, Administrative Tools,
Internet Information Services. Right click on Internet Information Services,
Connect and enter the host computer’s IP address, e.g. 192.168.0.1.
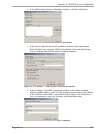
Verify the IIS web server by opening a web browser on another host on the network
and entering the URL http:// followed by the IP address IIS was installed with,
followed by /ruggedcom, e.g. http://192.168.0.1/ruggedrouter.
Visit the router you wish to upgrade and visit the Maintenance menu, Upgrade
System sub-menu. Click on the Change Server button and set the Repository Server
field (e.g. http:// 192.168.0.1/ruggedcom). Set the Release Version field to rr1. Save
the configuration and return to the Maintenance menu. Set the Only show which
packages would be upgraded radio button to No and click on the Upgrade Now
button to start the upgrade.
300 RuggedCom
Figure 269: Installing IIS