


Adjustment Procedures
32
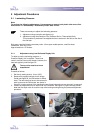
5-5 Drive Chain
Necessary tools: Allen key 4mm, medium flat-head screwdriver.
Approximate time: 8 minutes.
Note: to perform the following adjustments, it is necessary to remove the right-hand side cover first.
See section 4-1: Disassembly / Reassembly Plastic Side Covers.
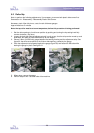
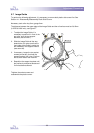
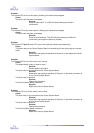
The chain guide ensures that the chain has
sufficient grip on the clutch assembly.
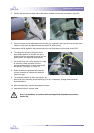
See figure 36. If the lower section of the chain
(black arrow) has more play than 6 mm (1/4’’), then
the tensioner should be adjusted.
1. To do this, loosen the M5 socket screw half a
turn, and rotate the chain adjuster a bit
clockwise (white arrow).
2. Tighten the M5 bolt again whilst holding the
adjuster with the flat-head screwdriver.
3. Check the play of the lower part of the chain
again (black arrow). There should be a play of
roughly 1-2 mm, so the chain must never be
too taut.
Replace the plactic covers.
5-6 Clutch
Necessary tools: open-ended spanner 19mm.
Approximate time: 15 minutes.
Note: to perform the following adjustments, it is necessary to remove the right-hand side cover first.
See section 4-1: Disassembly / Reassembly Plastic Side Covers.
To ensure that the film is not slipping between the pull rollers, yet receiving sufficient tension, the
clutch has to be adjusted properly.
Proceed as follows:
1. Set the machine up for encapsulation using JetGuard 5mil gloss or Thermashield 5mil gloss. Run
the process at 120°C setting, whereas the speed setting should be 2 (which is lower than the
values on the Process Control sticker!). Don’t process any images.
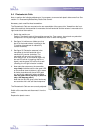
2. While the machine is running, turn the large nut (see figure 36, arrow 3) clockwise, until the friction
discs (arrows 4) are NOT moving in respect of each other. The film, running through the pull
rollers, may create a squeeking noise now.
3. Next, turn the large nut slowly anti-clockwise, just until the discs start moving in respect of each
other again. Continue running the encapsulation process for two minutes to ensure that this
situation is stable.
Replace the plactic covers.
fig. 36
2
3
4