


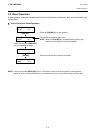
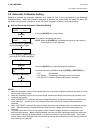


3. ON LINE MODE EO13-33002
3.7 Real Time Clock (RTC) Setting
3-13
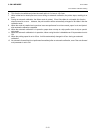
NOTES:
1. Be sure to load the battery and set the low battery check function to ON whenever the real time clock is used.
If the battery is not loaded or the battery voltage is low, the real time clock data is erased at the power off time.
2. When the low battery check function is set to ON, the printer stops at the power on time due to a “LOW
BATTERY” error if the battery voltage is 1.9V or less. As a restart is invalidated in this case, hold down the
[RESTART] key to cause the printer to enter <1>RESET mode, access the Real Time Clock setting mode, and
set the low battery function to OFF.
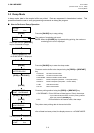
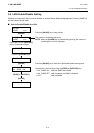
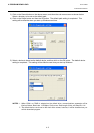
(Continued from the previous page)
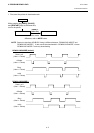
Hou
r
Minute
Pressing the [PAUSE] key enables setting the Hour.
Set the Hour with the [FEED] or [RESTART] key. Pressing
the [PAUSE] key fixes the Hour and cause the cursor to
move to the Minute.
Set the Minute with the [FEED] or [RESTART] key.
Pressing the [PAUSE] key fixes the Minute and cause the
cursor to move to the Second.
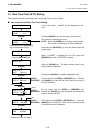
Set the second with the [FEED] or [RESTART] key. Press
the [PAUSE] key to fix the Second. Then, the Low Batter
y
Check selection screen is displayed.
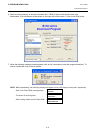
Pressing the [PAUSE] key enables choosing whether to
activate the low battery check function or not. Set the
function to ON or OFF with the [FEED] or [RESTART] key.
ON: Low battery check function is activated.
OFF: Low battery check function is not activated. (Default)
Press the [PAUSE] key to fix the setting. Then, the RTC
Data Renewal Timing setting screen is displayed.
Pressing the [PAUSE] key enables choosing the RTC data
renewal timing.
Choose PAGE or BATCH with the [FEED] or [RESTART]
key.
PAGE: A real time can be printed on each media. However, the
printer needs to stop the motion before printing each
media to read the real time clock data.
BATCH: Batch print is possible. However, the same time is
printed on the all media issued in a batch because the real
time clock data is read only for the first media.
Press the [PAUSE] key to fix the setting. Then, the curren
t
date is displayed.
[PAUSE]
[FEED]
[RESTART]
<8>RTC SET
TIME H 00
/00/00
[PAUSE]
<8>RTC SET
TIME M 10/00
/00
[PAUSE]
[FEED]
[RESTART]
<8>RTC SET
TIME S 10/30/00
[PAUSE]
[FEED]
[RESTART]
Second
<8>RTC SET
LOW BATT. CHECK
[PAUSE]
<8>RTC SET
LOW BATT. OFF
[PAUSE]
[FEED]
[RESTART]
<8>RTC SET
RENEWAL
[PAUSE]
<8>RTC SET
RENEWAL BATCH
[PAUSE]
[FEED]
[RESTART]
<8>RTC SET
DATE 06/03/01
Press the [FEED] and [RESTART]
keys at the same time to return to
“<8>RTC SET” display.
<8>RTC SET