


2. SYSTEM MODE EO13-33002
2.5 Sensor Adjustment
2-60
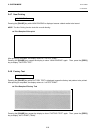
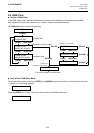
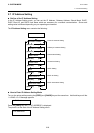
2.5.3 Feed Gap Sensor Adjustment
Follow the procedure below to store a backing paper level voltage of the Feed Gap Sensor.
(1) Place the backing paper (labels are removed) in the printer so that the Feed gap Sensor detects it.
(2) Press and hold the [RESTART] or [FEED] key for more than 3 seconds.
(3) Remove the backing paper from the printer.
(4) Press the [PAUSE] key to show a paper end status of the Black Mark Sensor and the Feed Gap
Sensor.
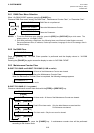
2.5.4 Black Mark Sensor and Feed Gap Sensor Adjustment (Paper End Level)
Follow the procedure below to store a paper end level voltage of the Black Mark Sensor or Feed Gap
Sensor.
(1) Remove any paper from the detecting area of the Black Mark Sensor and the Feed Gap Sensor.
(2) Press and hold the [RESTART] or [FEED] key for more than 3 seconds.
(3) Press the [PAUSE] key to show a real-time status of the ribbon end sensor.
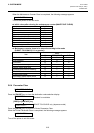
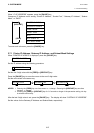
2.5.5 Ribbon End Sensor Adjustment (Ribbon Level)
Follow the procedure below to store a ribbon level voltage of the ribbon end sensor.
(1) Place the ribbon in the printer so that the ribbon end sensor detects it.
(2) Press and hold the [RESTART] or [FEED] key for more than 3 seconds.
(3) Press the [PAUSE] key to return to “<5>SENSOR ADJ.” display.
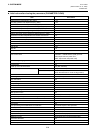
<5>SENSOR ADJ.
[PE]R0.2V T4.6V*
When storing a paper end level voltage is completed, “*” appears.
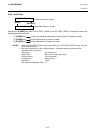
<5>SENSOR ADJ.
[TRANS.] 2.3V
Real-time status detected by the Feed Gap Sensor
0.0V to 5.0V
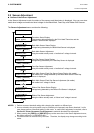
<5>SENSOR ADJ.
[TRANS.] 4.1V*
When storing a backing paper level voltage is completed, “*” appears.
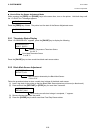
<5>SENSOR ADJ.
[PE]R0.2V T4.6V
Real-time status detected by the Black Mark Sensor (Paper end level)
Real-time status detected by the Feed Gap Sensor (Paper end level)
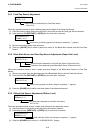
<5>SENSOR ADJ.
[RIBBON] 3.1V
Real-time status detected by the ribbon end sensor
0.0V to 5.0V
<5>SENSOR ADJ.
[RIBBON] 3.1V*
When storing a ribbon level voltage is completed, “*” appears.