


110
Pedestal
This sets whether or not the pedestal is installed.
Not installed - Select this when no pedestal is installed.
Pedestal 1 - Select this when the Paper Feed Pedestal (KD-1009) is installed.
Pedestal 2 - Select this when the Paper Feed Pedestal (KD-1009) and the Cassette Module
Device (MY-1017) are installed.
Large Capacity Feeder - Select this when the Large Capacity Feeder (KD-1010) is installed.
Finisher
This sets whether or not the finisher is installed.
Not Installed - Select this when no finisher is installed.
Hanging Finisher - Select this when the Hanging Finisher (MJ-1011) is installed.
Finisher - Select this when the Finisher (MJ-1012) is installed.
Saddle Stitch Finisher - Select this when the Saddle Stitch Finisher (MJ-1013) is installed.
Punch Unit
This sets whether or not the hole punch unit is installed. This can be selected when “Hanging
Finisher”, “Finisher” or “Saddle Stitch Finisher” is selected at “Finisher”.
Not Installed - Select this when no hole punch unit is installed.
2 Hole Punch Unit - Select this when the 2 Hole Punch Unit (MJ-6001E) is installed.
2/3 Hole Punch Unit - Select this when the 2/3 Hole Punch Unit (MJ-6001N) is installed.
4 Hole Punch Unit (F) - Select this when the 4 Hole Punch Unit (F) (MJ-6001F) is installed.
4 Hole Punch Unit (S) - Select this when the 4 Hole Punch Unit (S) (MJ-6001S) is installed.
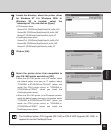
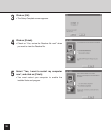
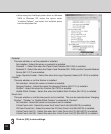
3
Click on [OK] to save settings.
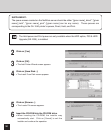
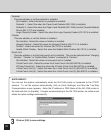
SUPPLEMENT:
You can set the options automatically when the GA-1040 printer is connected to the TCP/IP
network. To set the options automatically, click on [Auto Settings], and then the Two-Way
Communication screen appears. Enter the IP address or DNS Name of the GA-1040 printer in
the field and click on [Update]. It begins communicating to the GA-1040 printer via network and
obtain the option settings automatically.