


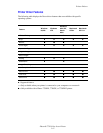
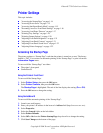


Printer Settings
Phaser® 7750 Color Laser Printer
1-19
Using the Front Panel
To specify the tray sequence:
1. At the printer’s front panel, select Printer Setup, then press the OK button.
2. Select Paper Handling Setup, then press the OK button.
3. Select Tray Sequence, then press the OK button.
4. Scroll to the desired tray sequence. (If you want to turn off tray switching, select Off.)
5. Press the OK button to save the changes.
Using CentreWare IS
To specify the tray sequence:
1. Launch your web browser.
2. Enter your printer’s IP address in the browser’s Address field (http://xxx.xxx.xxx.xxx).
3. Select Properties.
4. Select the General folder on the left sidebar.
5. Select Printer Defaults.
6. Select the desired tray sequence from the Tray Sequence drop-down list. (If you want to
turn off tray switching, select Off.)
7. Click the Save Changes button at the bottom of the screen.
Selecting the Default Tray
If you do not want to use tray switching, you can specify a default tray to use for printing jobs.
The default tray contains the paper type and size used for printing jobs. When the default tray
is empty, or contains a different paper type, you are prompted to load the correct paper type in
the tray even if another tray contains the correct paper type and size for the job.
You can select the default tray by two different methods:
■ The printer’s front panel
■ CentreWare IS
Using the Front Panel
To select a default tray:
1. Select Printer Setup, then press the OK button.
2. Select Paper Handling Setup, then press the OK button.
3. Select Paper Source, then press the OK button.
4. Scroll to the desired tray to use as the default tray. (If you want tray switching enabled,
select Auto Select.)
5. Press the OK button to save the change.
Note
The driver overrides the front panel settings and CentreWare IS for tray selection.