Setting Up the DocuPrint 4512/4512N
12
❖
Setting Up Guide
Te s t i ng t h e
Printer
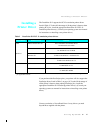
To test the printer, power it ON, then print a configuration sheet using
the Control Panel.
1
Power ON the printer and observe the following sequence on the
Control Panel:
The display reads
Self Test
.
The
On Line
light goes on.
The display reads
Emulation Size/Size
.
where
Emulation
is the emulation (PCL, PS2, Auto, HEX), and
Size/Size
is the size of paper in the upper tray/lower tray.
2
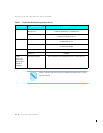
Press On Line .
The
On Line
light goes off.
The display reads
Printing Menu
.
3
Press Menu until:
The display reads
Test Menu
.
4
Press Item until:
The display reads
Config. Sheet
.
5
Press Enter .
The
Data
light goes on and the Configuration Sheet prints.
If the Configuration Sheet does not print, refer to
Chapter 6:
Troubleshooting
in the
DocuPrint 4512/4512N User Guide
.
When the page finishes printing, the DATA light goes off.
6
Press On Line .
The
On Line
light goes on.
The display reads
Emulation Size/Size
.
7
If you have purchased printer options, power off the printer, unplug
the power cord, and continue to
“Installing Printer Options”
(page 13). Otherwise, skip to
“Connecting to the Host”
(page 14).


