


Chapter 15 Link Aggregation
ES-2024 Series User’s Guide
119
The following table describes the labels in this screen.
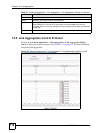
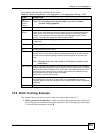
15.6 Static Trunking Example
This example shows you how to create a static port trunk group for ports 2-5.
1 Make your physical connections - make sure that the ports that you want to belong to
the trunk group are connected to the same destination. The following figure shows ports
2-5 on switch A connected to switch B.
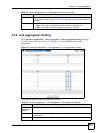
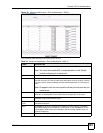
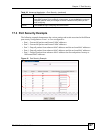
Table 34 Advanced Application > Link Aggregation > Link Aggregation Setting > LACP
LABEL DESCRIPTION
Link
Aggregation
Control
Protocol
Note: Do not configure this screen unless you want to enable
dynamic link aggregation.
Active Select this checkbox to enable Link Aggregation Control Protocol (LACP).
System
Priority
LACP system priority is a number between 1 and 65,535. The switch with the lowest
system priority (and lowest port number if system priority is the same) becomes the
LACP “server”. The LACP “server” controls the operation of LACP setup. Enter a
number to set the priority of an active port using Link Aggregate Control Protocol
(LACP). The smaller the number, the higher the priority level.
Group ID The field identifies the link aggregation group, that is, one logical link containing
multiple ports.
LACP Active Select this option to enable LACP for a trunk.
Port This field displays the port number.
* Settings in this row apply to all ports.
Use this row only if you want to make some settings the same for all ports. Use this
row first to set the common settings and then make adjustments on a port-by-port
basis.
Note: Changes in this row are copied to all the ports as soon as you
make them.
LACP Timeout Timeout is the time interval between the individual port exchanges of LACP packets in
order to check that the peer port in the trunk group is still up. If a port does not respond
after three tries, then it is deemed to be “down” and is removed from the trunk. Set a
short timeout (one second) for busy trunked links to ensure that disabled ports are
removed from the trunk group as soon as possible.
Select either 1 second or 30 seconds.
Apply Click Apply to save your changes to the Switch’s run-time memory. The Switch loses
these changes if it is turned off or loses power, so use the Save link on the top
navigation panel to save your changes to the non-volatile memory when you are done
configuring.
Cancel Click Cancel to begin configuring this screen afresh.