


Installing and Connecting the NIC
11
3
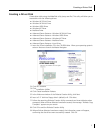
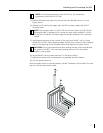
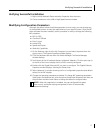
Remove the blank cover plate from the slot that you selected (see item 1 in the
figure, below).
4
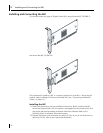
Holding the PCI card by the edges, align the NIC’s connector edge with the PCI
connector dock.
5
Applying even pressure at both corners of the card, push the NIC until it is firmly
seated in the PCI slot. When properly seated, the NIC’s port connectors will be aligned
with the slot opening, and its faceplate will be flush against the system chassis.
6
Secure the NIC with the screw (see item 2 in the figure, below).
7
Replace the system cover and disconnect any personal anti-static devices.
8
Turn the system power on.
After the system returns to normal operation, the NIC hardware is fully installed. The next
step is to connect the network cables.
NOTE:
For optimal performance, select a PCI-X slot. For second best
performance, select a 64-bit PCI slot.
NOTE:
The connector dock in a 32-bit PCI slot is shorter than in a 64-bit PCI slot.
Although the NIC is designed to fit in either slot type, when installed in a 32-bit
PCI slot, part of the NIC’s connector edge will remain undocked. This is perfectly
normal.
CAUTION:
Do not use excessive force when seating the card, as this may damage
the system or the NIC. If the card resists seating, remove it from the system,
realign it, and try again.
1
2