


110
SERVSWITCH™ AND SERVSWITCH ULTRA™
F.2 The Installation Procedure
CAUTION!
Installing the 4-Port Expansion Board requires almost completely
disassembling the ServSwitch or ServSwitch Ultra. This can be
complicated and time-consuming, and it is possible to damage the
Switch. We recommend that you let us install the Board for you at our
factory—call Black Box to arrange this.
If you do install the 4-Port Expansion Board yourself, take every
reasonable caution against static electricity. At the very least, discharge
yourself on a metallic surface before touching the Board; if possible,
stand on an anti-static mat and wear a grounding strap or anti-static
gloves.
Also, you will be removing many screws during the course of the
installation. These screws are different lengths and sizes, so note
carefully which type of screw goes in which screwhole.
To install the 4-Port Expansion Board in a ServSwitch or ServSwitch Ultra, take
these steps:
1. Make sure the Switch is turned OFF, unplugged, and disconnected from all
other devices.
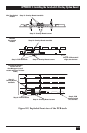
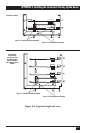
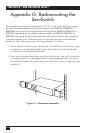
2. Unscrew and remove the six screws (four on top and one on each side) that
fasten the wraparound top-and-side cover to the Switch. See Figure F-1 on the
next page.
3. Remove the Switch’s top cover.
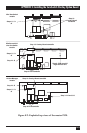
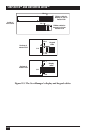
4. Unscrew and remove the three countersunk screws on the bottom panel that
fasten the back panel to the bottom panel. See Figure F-2 on the next page.
5. Unscrew and remove the three countersunk screws on the Switch’s bottom
panel that fasten the Switch’s PCB(s) (printed circuit board[s]) to the panel.
See Figure 2-2 on the next page.
6. Separate the Switch’s PCB(s) and back panel from the bottom panel, being
very careful not to bend the LEDs.
7. Depending on how many Expansion Boards you are installing, you will need
to remove two or more of the CPU-port blanks (covering plates) that are
attached to the Switch’s back panel and cover the CPU-port slots—see
Figure F-3 on page 113. Unscrew and remove the screws that fasten these
blanks to the back panel, then remove the blanks themselves.